| Introduction This article presents a simple method of adding a delay between the time when the lightning flashes and the sound is heard. The circuitry is based on an earlier article on Thunder and Lightning Animation that can be seen here: http://www.trainelectronics.com/Animation-thunder-lightning/index.htm & video here: https://www.youtube.com/watch?v=7WtKiwUSyco&t=2s While the first article and related video were well received a number of folks who built the circuit requested a modification that would more closely mimic a situation where the thunder is delayed for a time after the lightning is seen. This delay is based on the fact that sound travels much more slowly than light. When a lightning flash occurs an observer sees it instantly as the speed of light is 300,000,000 meters / second. Sound travels at a speed of about 340 meters / second, quite a bit slower than light! If a lightning strike occurs one mile from an observer it takes about 5 seconds before the thunder is heard. The purpose of the modified project is to simulate this type of delay. |
|
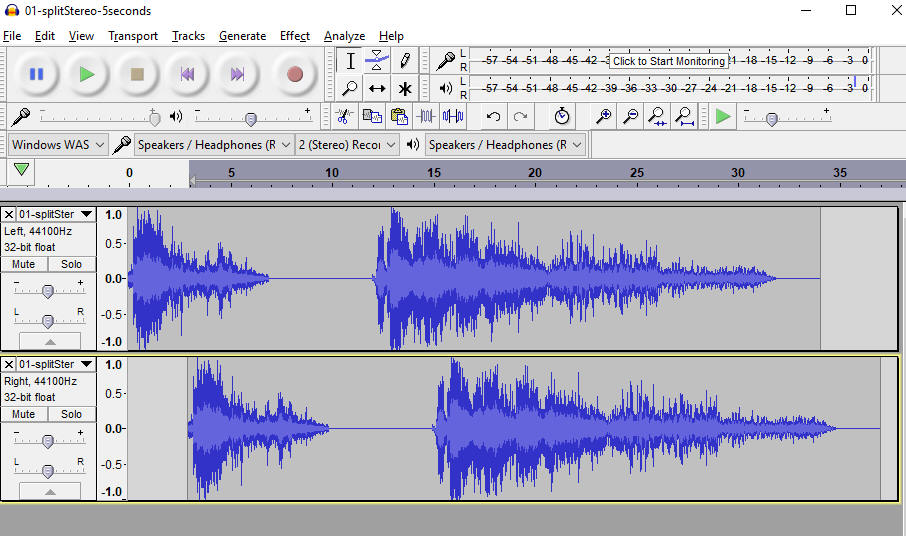
| How it Works The Arduino that is used doesn't have the memory to do a proper delay within its circuitry. It wasn't until I decided to look beyond the Arduino to the DFPlayer, that has a great deal of memory available, that I came up with a reasonably simple way to implement the desired delay. The DFPlayer has the capability of playing a fully stereophonic sound utilizing separate left and right channel audio. In the original circuit that I made this stereo capability was not needed as the sound worked just fine when played as monophonic. The left and right channels were combined and the output was monophonic and sounded great. To get the delay I reasoned that I could separate the two stereo channels and put the sound file on one and a copy of the sound file, shifted a second or more later in time, on the other channel. The first channel would connect to the Arduino to trigger the bright, white LEDs. The second channel would play the same sound, only a moment later, and it would play through the speaker to represent the delayed sound of thunder. In this image from the sound editor you can see the bottom channel is identical to the top channel but it is shifted a short time, about 3 seconds, to the right so that the sound will play after the first channel triggers the LEDs.
|
|
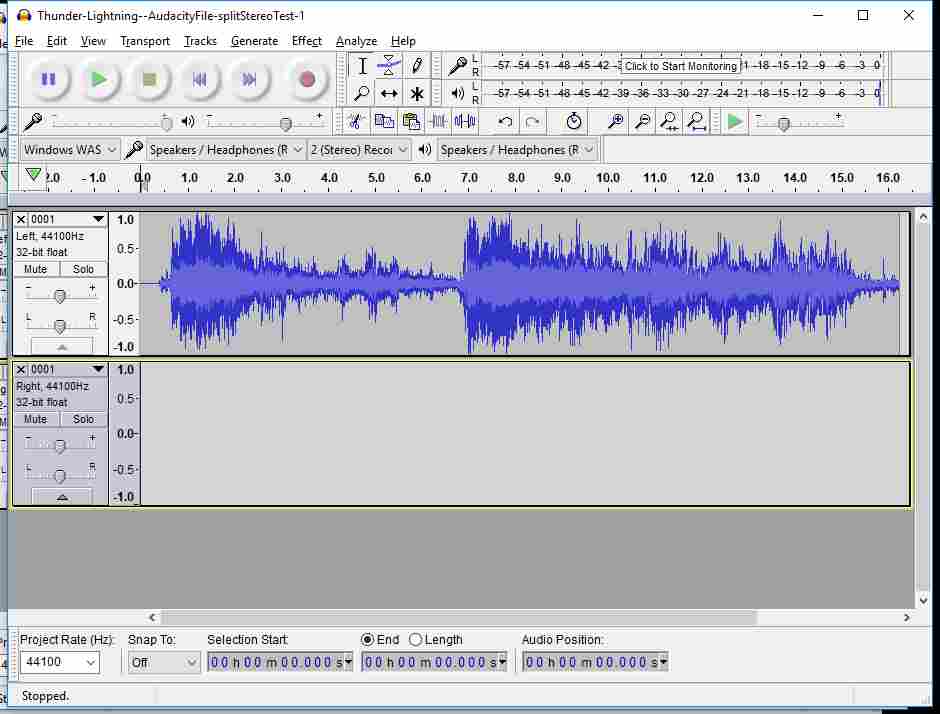
Stereo File in Audacity
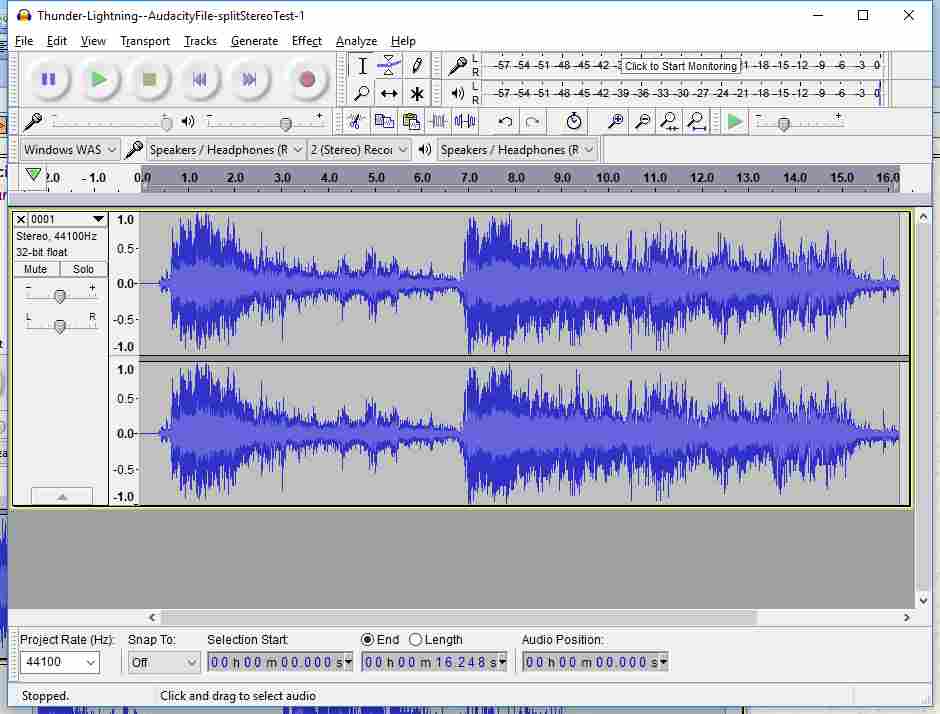
To set up the file that will provide one stereo track for the sound and the other for controlling the LED light flashes follow these steps: 1. Load your sound file that contains
claps of thunder ( to download mine
click here )
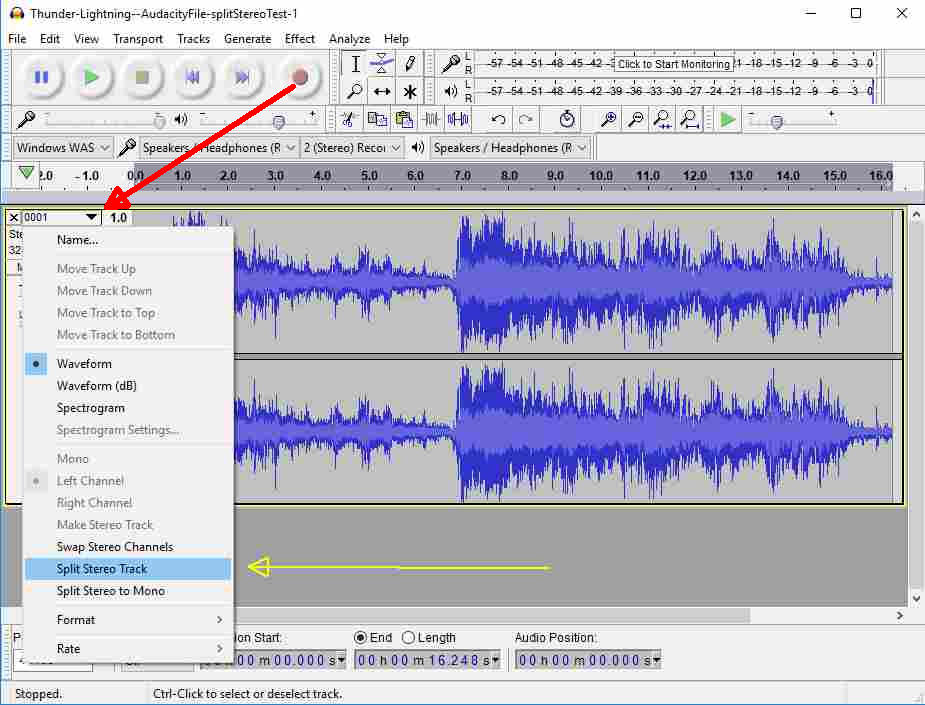
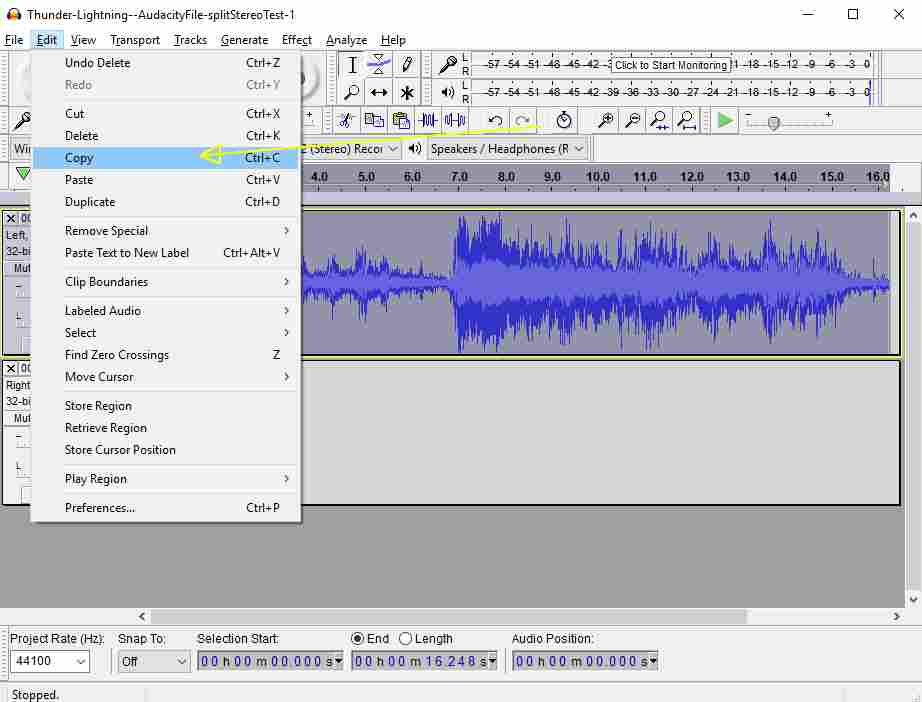
Click the small down pointer (see the red arrow) to bring up the track menu. Click "Split Stereo Track" (see yellow arrow) to create two separate stereo tracks.
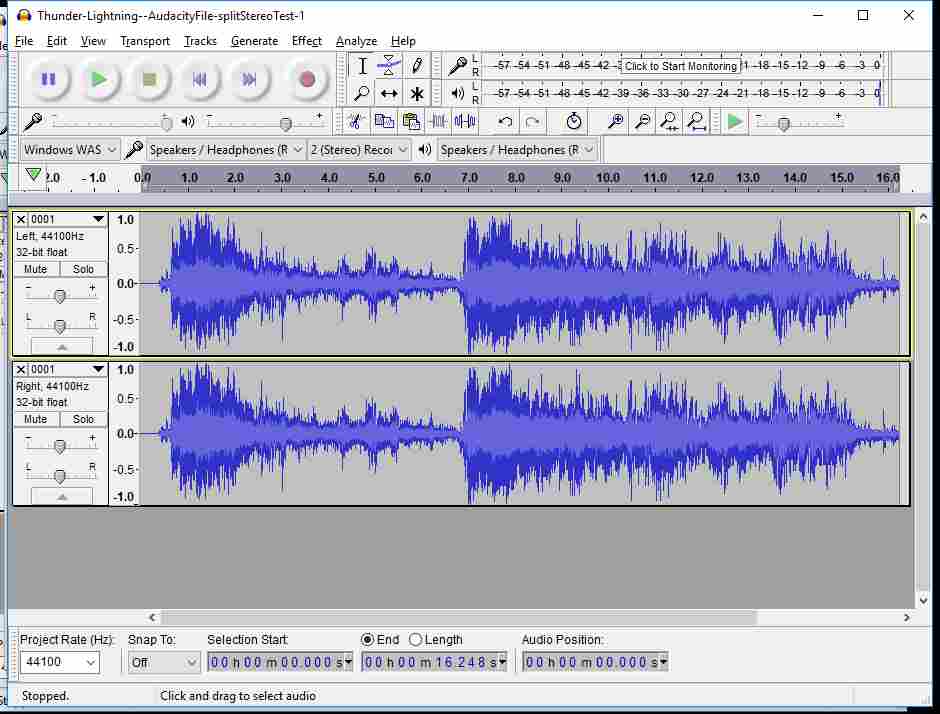
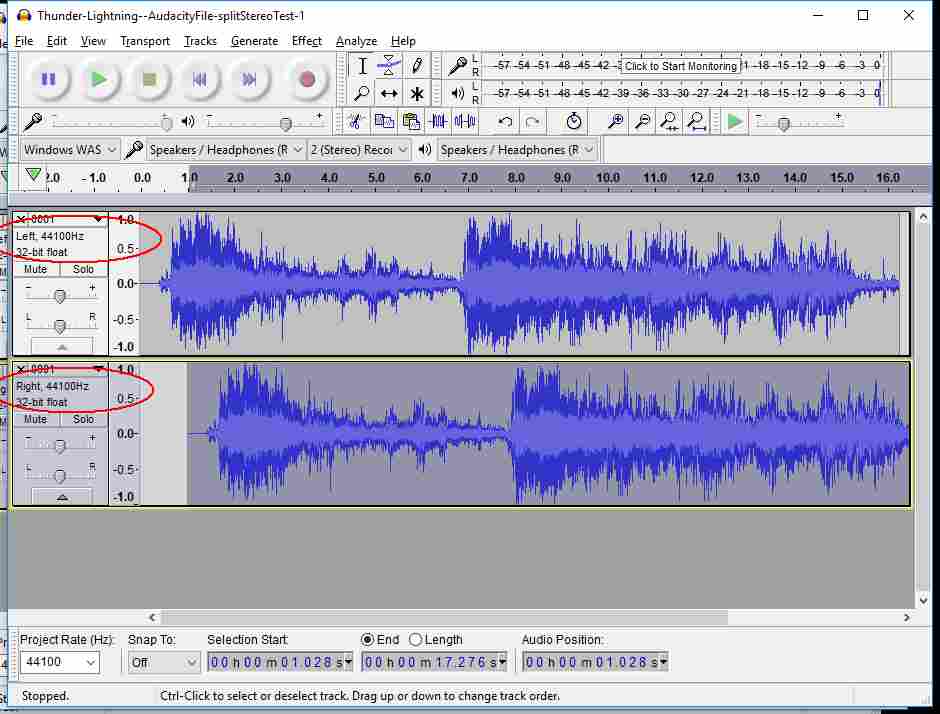
The result should look like this with a separate box to the left for the Left and Right channels.
Use the mouse to drag and select all of the bottom track and press the Delete key to remove it
Select all of the top track and click Edit / Copy to make a copy of it
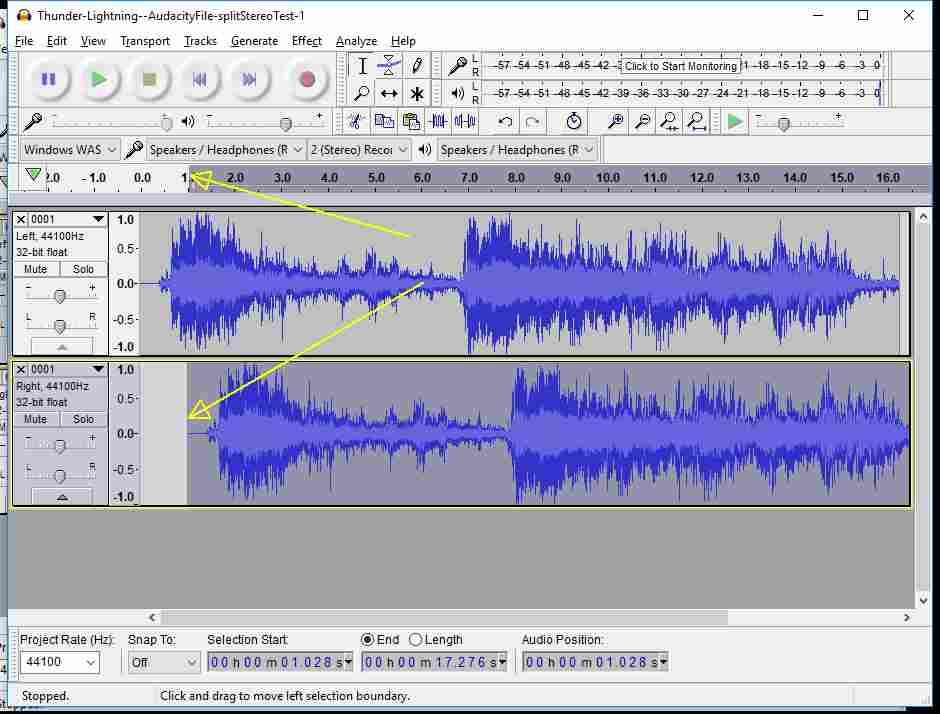
Place the cursor 1 or 2 seconds to the right in the bottom box and paste in the audio (click Edit / Paste or press Ctrl V). It should look like this
Note that the top track is called the LEFT channel and the bottom is RIGHT. The Right channel is the one that needs to be shifted to the right. It is the channel that you hear. The other channel triggers LEDs.
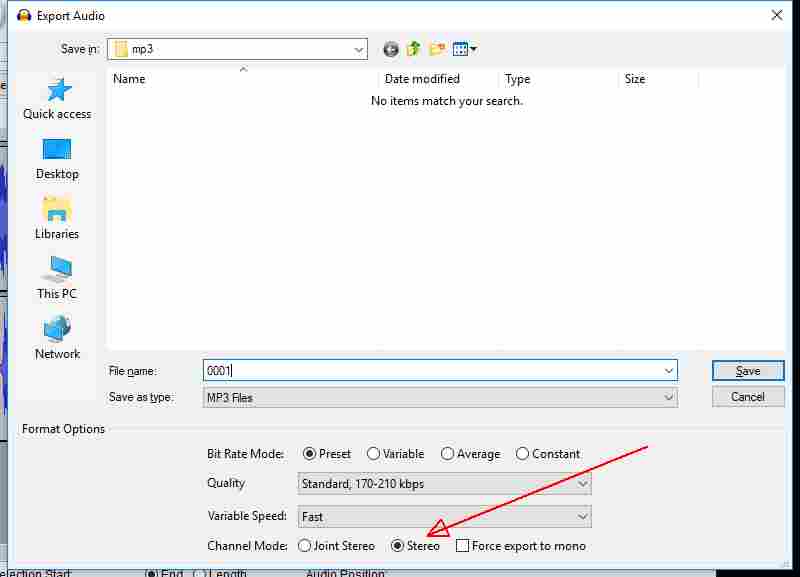
Export the MP3 file by clicking File / Export / Export as MP3. In the dialog box make sure "Stereo" is selected (see red arrow)
Save the file to the "mp3" directory on your microSD card. It must be named 0001.mp3
|
|
|
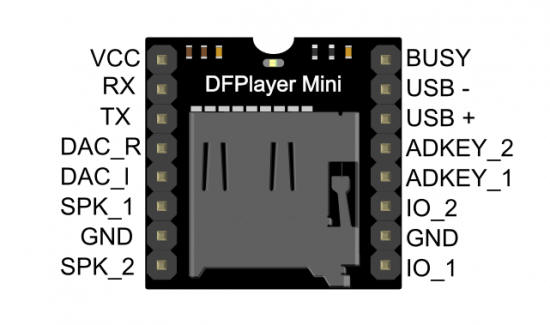
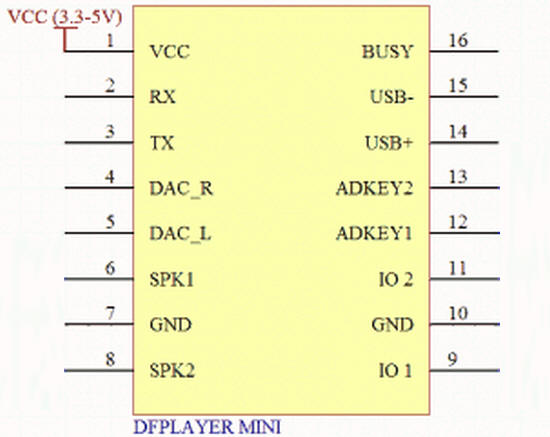
Schematic Changes There are two audio output methods that are employed by the DFPlayer. The DFPlayer's pins are shown here.
You can connect an 8 ohm speaker (NOT a 4 ohm speaker!) to pin 6 (SPK_1) and pin 8 (SPK_2). These two output pins connect to the DFPlayer's built-in amplifier and give a clear sound at a reasonably high volume. These connections are the ones that I used in the original project. The audio that goes to SPK_1 and SPK_2 is a monaural sound that combines the two stereo channels of the MP3 file. Unfortunately this amplified speaker output cannot be used with this revision of the project as you would hear both the left and right channels. You will recall that the left channel is not to be heard but is to be used to trigger the LEDs. The right channel goes to an amplified speaker. The original circuit had audio from the speaker output of the DFPlayer going to pin A0 on the Arduino where it was used to trigger the LED flashes. For this version the Left channel output (DAC-L pin on the DFPlayer) goes to pin A0 on the Arduino. The audio output that can be heard comes from the Right channel. For the sound of thunder connect an amplified speaker, like one from a computer's speaker system or an MP3 speaker that has an input connection, to the DAC-R and ground pins on the DFPlayer. The only change to the schematic is shown here. Pin 17 ( A0 ) from the Arduino connects to pin 5 (DAC_L) on the DFPlayer. Connect the DFPlayer's pins 4 (DAC_L) and pin 7 (Ground) to the input pins on an amplified external speaker.
|
|
| Software Changes The only change to the software is to modify the two numbers that are used to turn the LEDs on and off. You may recall that the software looks at the value generated at pin A0 from the sound output from the DFPlayer to turn the LEDs on and off. When the number was at least 750 the LEDs went on. When it dropped to 666 or below the lights went off. These two values are highlighted below. These numbers need to be changed since pin A0 is no longer connected to the amplified output for the speaker as it was in the original version. A0 is connected to the DAC_L output which is an unamplified output. I experimented a bit and found that using 900 for the first number and 900 for the second worked well. You may need to adjust these up and down to fit your audio file. Remember that you can see the value of A0 in the Arduino terminal window. This will help you to determine the optimal values. Note: I made two variables for the light triggers, "trigger1" and "trigger2". I found that using 900 for both worked well for me. You may need to do some experimentation to find the best value for your project and MP3 file. The maximum and minimum values are displayed on the terminal just before where it says "Waiting for Button Push" Here is the full sketch with the adjusted values. You can copy/past the code below or download here: DOWNLOAD /*
d. bodnar - 7-29-2018
Lightning & thunder for CHP castle
modified to have two tracks on MP3 card
one (left/top) does the light
and the other (right/bottom) does sound
set delay in Audacity
*/
#include <DFPlayer_Mini_Mp3.h>
const int buttonPin = 3; // the number of the pushbutton pin
int buttonState = 0; // variable for reading the pushbutton status
int buusyPin = 10;// buusyPin = 10; // sound player busy
int bsy = 0;
int LEDstripLight = 12; // IRL520 to LED strip light
int max=0;
int min=9999;
int sensorPin = A0; // Audio level samples
int sensorValue = 0; // variable to store the value coming from the sensor
int buttn = 0;
void setup () {
pinMode(buttonPin, INPUT);
pinMode(LEDstripLight, OUTPUT);
pinMode(buusyPin, INPUT);
pinMode(buttonPin, INPUT);
Serial.begin (9600);
mp3_set_serial (Serial); //set Serial for DFPlayer-mini mp3 module
mp3_set_volume (30); // must remove mp3_reset(); to get this to work
}
void loop () {
Serial.println("");
Serial.print(min);
Serial.println("");
Serial.println(max);
Serial.println("Waiting for Button Push");
do {
buttn = digitalRead(buttonPin); // pins closest to power pins
} while (buttn == 0);
Serial.println("Button Hit");
mp3_play(1);
delay(100);
do {
// 900 for both works well when running from a 7+ volt power supply
int trigger1 = 900;
int trigger2 = 900;
sensorValue = analogRead(sensorPin);
if (sensorValue> max) max=sensorValue;
if (sensorValue < min) min=sensorValue;
Serial.print(sensorValue);
Serial.print(" ");
if (sensorValue >=trigger1) { // wsa 750 on amplified out
Serial.print("+ ");
digitalWrite(LEDstripLight, HIGH);
}
if (sensorValue <= trigger2) { // was 666 on amplified out
digitalWrite(LEDstripLight, LOW);
Serial.println("- ");
}
bsy = digitalRead(buusyPin);
} while (bsy == 0); // zero when sound active
digitalWrite(LEDstripLight, LOW);
}
|
|
| Conclusion I hope you have a chance to try the modified version with the delayed sound and find it useful to your application. |
|
| Random Sound
File The code below will randomly select a sound file named from 0001.mp3 through 0005.mp3. If you want to have it choose from more than 5 files change the line that is highlighted. You need to add one to the highest value you want - for 5 enter 6, for example. |
|
/*
   d. bodnar - 7-29-2018
   Lightning & thunder for CHP castle

   modified to have two tracks on MP3 card
   one (left/top) does the light
   and the other (right/bottom) does sound
   set delay in Audacity
*/

#include <DFPlayer_Mini_Mp3.h>

const int buttonPin = 3;     // the number of the pushbutton pin
int buttonState = 0;         // variable for reading the pushbutton status
int buusyPin = 10;// buusyPin = 10; // sound player busy
int bsy = 0;
int LEDstripLight = 12; // IRL520 to LED strip light
int max = 0;
int min = 9999;
int sensorPin = A0;    // Audio level samples
int sensorValue = 0;  // variable to store the value coming from the sensor
int buttn = 0;

void setup () {
  pinMode(buttonPin, INPUT);
  pinMode(LEDstripLight, OUTPUT);
  pinMode(buusyPin, INPUT);
  pinMode(buttonPin, INPUT);
  Serial.begin (9600);
  mp3_set_serial (Serial);	//set Serial for DFPlayer-mini mp3 module
  mp3_set_volume (30);          // must remove mp3_reset(); to get this to work
}

void loop () {
  Serial.println("");
  Serial.print(min);
  Serial.println("");
  Serial.println(max);
  Serial.println("Waiting for Button Push");
  int zz = random(1, 6); //set max to number of mp3's
  Serial.println("Random File = ");
  Serial.print(zz);
  Serial.println("");
  do {
    buttn = digitalRead(buttonPin); // pins closest to power pins
  } while (buttn == 0);
  Serial.println("Button Hit");

  mp3_play(zz);
  delay(100);
  do {
    // 900 for both works well when running from a 7+ volt power supply
    int trigger1 = 900;
    int trigger2 = 900;
    sensorValue = analogRead(sensorPin);
    if (sensorValue > max) max = sensorValue;
    if (sensorValue < min) min = sensorValue;

    Serial.print(sensorValue);
    Serial.print(" ");
    if (sensorValue >= trigger1) { // wsa 750 on amplified out
      Serial.print("+ ");
      digitalWrite(LEDstripLight, HIGH);
    }
    if (sensorValue <= trigger2) { // was  666 on amplified out
      digitalWrite(LEDstripLight, LOW);
      Serial.println("- ");
    }
    bsy = digitalRead(buusyPin);
  } while (bsy == 0); // zero when sound active
  digitalWrite(LEDstripLight, LOW);

}
|