05-28-08
11-01-18
MP3 Sound System
05-28-08
11-01-18
Introduction
Model railroads thrive on sound and should rarely be silent. Engines,
especially steam locomotives, come to life once a quality sound system is
installed. Many of our layouts, however, have little in the way of sound
that does not come directly from the train.
I have created a number of animations that do things like opening outhouse doors or causing little critters to pop out of the ground and each one of these is better if it is coupled with appropriate sound effects.
One of my favorite animations is of a gold mine. It has no moving parts at all, just a series of high quality sound effects synchronized with a bright flashing light that simulates an explosion deep within the mine.
Digital Sound Cards
Sound effects need to be stored somehow so that they can be activated at the right time. For years our only choice was magnetic tape. Digital devices now allow us to store sound files on microchips. There are a number of companies, including ITT Sound, Miller Models and Ram Track, that market sound boards that have a specific sound effect recorded on them. These range from a loud clap of thunder to animal noises to all types of train sounds. The only problem with these boards is that we cannot modify the sounds on them to more closely suit our needs and desires. Some of the companies will record your sound file for you but I was looking for something that I could change easily and in just a few minutes, not the days or weeks that it might take to have a custom board created.
My first experience with creating my own sound recordings was with two boards that are available to hobbyists. These are described in some detail in my article: "Give Your Railroad a Voice Part II." The boards described there are a wonderful, cost effective way to add short sound clips to the railroad. They do, however, have several limitations. Depending on the board the length of the sound is limited to something between 10 seconds and two minutes. This is sufficient for many things but not all. Their main problem is sound quality. The limited amount of digital storage space on the chips keeps them from providing anything that even vaguely resembles high fidelity.
What I wanted was a way to use an MP3 player to provide sound for my railroad. The length of the sound files that can be stored on any MP3 player is more than enough for anything I could imagine and most importantly the sound quality is superb!
MP3 Players
I experimented with several inexpensive consumer MP3 players and was frustrated with the results. The biggest problem was "hacking" their controls. Every player seems to have a different user interface, menu system and set of buttons or knobs. I got several to work but it was not something that I could recommend to others.
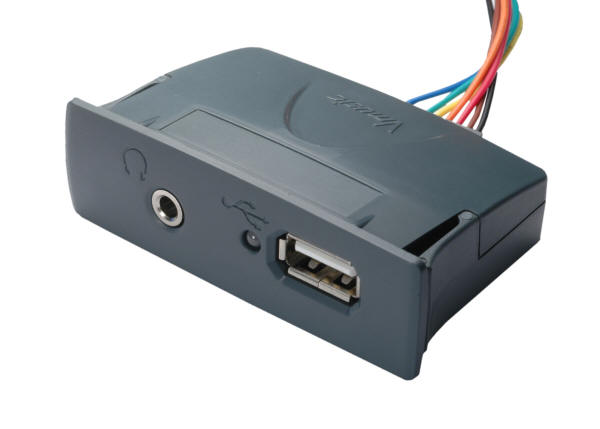
As luck would have it I stumbled upon an advertisement in one of my electronics journals that spoke of an MP3 module that would interface directly with a microcontroller such as the PICAXE or Microchip PIC. More significantly it used common USB flash drives to store sound files.
What is so special about flash drive storage of sound files you might ask? The ability to control the MP3 player with a PICAXE is a wonderful thing as it makes activating and sequencing sounds a snap. But the real key to making this unit so flexible for the end user is the fact that you need nothing more than a computer with a USB port to change the sounds. PC, Mac, Linux, it doesn't matter! And better yet, sound files are readily available on the Internet at little or no cost and the software to edit the sounds is free.
This device I am speaking of, the VMUSIC2, was briefly described in my article on the gold mine explosion.
In this article I would like to expand on this and use the same board to allow a plethora of sounds to be added to your layout!
Microcontroller Options
The gold mine article mentioned above describes in some detail how to interface a PICAXE to the VMUSIC2 module so I won't spend any more time on that approach here. The PICAXE does a good job of controlling the MP3 player but I wanted this project to have more functionality than what is used in the gold mine explosion. I chose to use a different microcontroller, a PIC 16F88. This is not a chip that most beginning hobbyists would choose but it does have more memory and more functionality than the PICAXE and that is something that I knew that I would need for this project.
MP3 Music Controller Features
Plays files that are stored on a standard USB memory stick.
Uses simplified file names composed of a number followed by the ".mp3" extension: 1.mp3, 2.mp3, 3.mp3 and so on.
Sounds are selected by 8 simple push button switches (reed switches or relay contacts are OK, too)
Once a sound is started it will play until it is finished or until another switch is pressed.
Each switch is programmable so that it will either play the same sound every time or it will play one of 10 random sounds that are associated with that switch.
Programming is done with two push button switches on the controller.
During programming two LEDs and voice prompts give feedback about which button you are working on and if it is set for random selection.
The sound files for the 8 switches when they are in non-random mode are the same as the switch number. That is, when switch 1 is activated sound 1.mp3 plays. Switch 2 activates 2.mp3 and so on.
The random sound files for switch 1 are 10.mp3 through 19.mp3. Those for the second switch are 20.mp3 through 29.mp3 and so on with switch 8 using file names 80.mp3 through 89.mp3.
An external amplifier and speakers connect directly to the MP3 module.
Hardware
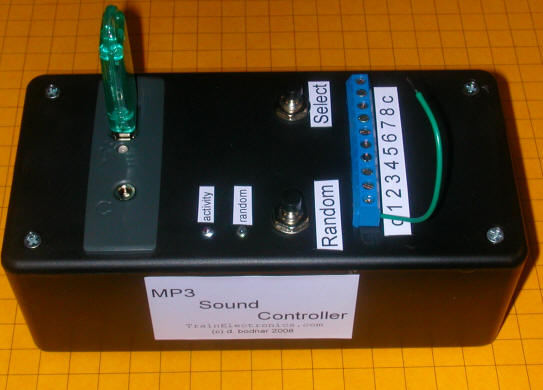
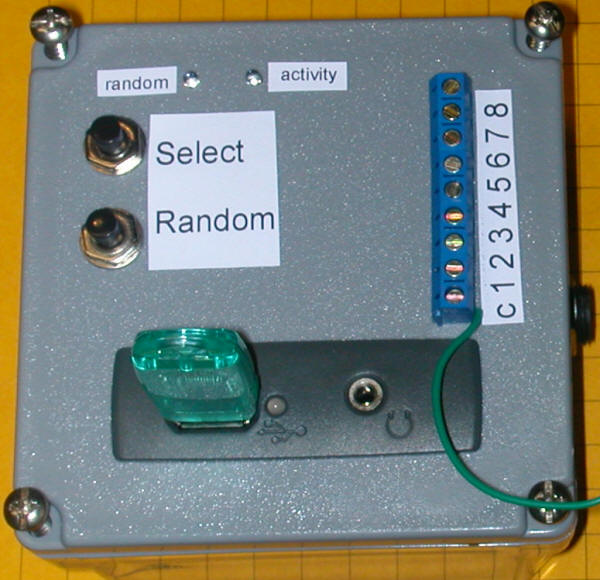
The prototype MP3 Sound Controller is shown here. The plug that goes to a set of amplified computer speakers is plugged into the VMUSIC2 module at the bottom. To its left is the USB memory stick. There is a small LED between the speaker plug and the memory stick. It is red while it is initializing and green when the unit is ready. Do not press any of the activation buttons while this LED is red.
The two buttons in the upper left are for changing the random / non-random setting for each activation switch. The two LEDs at the top, labeled "random" and "activity" help with the programming. The random LED is green when lit and the activity one is blue.
The 9 pin set of screw terminals on the right goes to the activation switches that will start each sound. The bottom screw terminal, labeled "c", is common and the ones above it are numbered sequentially from 1 to 8. One wire from each switch connects to the common terminal. The other wire from each switch goes to one of the numbered terminals. The green wire from the common terminal shown in the photo is there for testing.
Initial Configuration Video
This short video shows how to set up the unit and test its operation. You will note that in addition to the controller & memory stick you need a small DC wall wart power supply that provides between 7 and 12 volts and a set of standard amplified computer speakers with an 1/8" stereo input plug. You can also use a standard set of stereo headphones in place of the external speakers.
(Right Click the video below and select "Play")
Amplified Speaker Options
The MP3 Sound System does not normally include amplified speakers. The unit has a small amplifier on board that will drive a set of headphones but external amplified speakers must be used to get louder sounds. Generic and name brand computer speakers are available from any number of sources. I can honestly say that I have not purchased a new set of computer speakers in at least 10 years. They always seem to come with a new computer and the old ones never wear out. Virtually any of these speaker systems will work well. They only need to have a 1/8" stereo input plug, the one that normally goes in the computer's sound card. If you don't have a set sitting around collecting dust ask your friends and neighbors or visit the local Goodwill store as most of them have a computer recycling department.
Switches to Activate Sounds
Each sound is activated by a switch closure between the common terminal and one of the numbered terminals. Any kind of single pole single throw normally open switch can be used. When the switch is first closed the sound starts and continues to play until it is done or until another switch is closed. There is one exception to this that should be noted. If a switch is closed and held closed another sound cannot be started until that switch is opened. This could happen if a magnetic reed switch is activated by a passing train that stops with the magnet over the switch or if a relay is used to activate the sound.
Note that activating two switches in rapid succession will only play the sound file for the second switch. If the second switch is closed within a second or so the first sound never gets a chance to start. This can come in handy as you can place two reed switches on your track spaced a short distance apart. When the train runs in one direction one sound will play while the other sound will play if it runs in the other direction.
The wiring for the switches is shown here. One wire from each switch is connected to the common connection. The other wire goes to one of the numbered terminals. There is no need to use all of the switch connections if your application doesn't need them.
In the wiring diagram above each switch plays a sound or range of sounds. It is also possible to add one or more toggle switches so that other sound options become available.
The diagram below shows how the addition of one toggle switch (a four pole double throw such as item STS-70 from All Electronics) can be used to have the same four switches on your railroad trigger different sounds based on the toggle switch settings. This would be valuable, for example, if you ran a passenger train on the main line at some times and a freight train at other times. The sounds could easily be tailored to fit the train in operation by throwing the switch in one direction or the other. When the switch is in the down position, as shown, switch SW1 would play sound 1, SW2 would play sound 3, SW3 would play sound 5 and SW4 would play 7. When the toggle switch is thrown in the other direction the switches play sounds 2, 4, 6 and 8 respectively. Any number of different scenarios could be achieved by wiring one or more toggle switches between the activation switches and the controller.
If long wires are needed to connect the switches and the controller twisted pair wire should be used. Also avoid running the connecting wires along side of other cabling as noise from those wires could cause false triggering.
Switch Connection Video
This video shows how to connect push button or reed switches to the MP3 Sound Controller.
(Right Click the video below and select "Play")
Files on the USB Memory Stick
One of the nicest things about this unit is its ability to store files on a standard USB memory stick. This allows us to manage these files by simply inserting the memory stick into our computer. There are no special cables or download programs. On a Microsoft Windows computer this all can be done with the file management program called Windows Explorer.
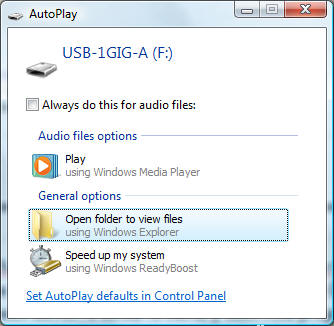
To view the files on the memory stick remove it from the Music Controller and insert it into a USB port on your computer. Most Windows computers are configured so that a box pops up when a new memory device is inserted. It asks what you would like to do. If your computer works this way simply click on the box that says "Open folder to view files". That will start Windows Explorer and show you the files on the memory stick.
If nothing appears you can open up a Windows Explorer window by doing one of the following:
Double click on "My Computer"
or
Right click on the Start Button and select "Explore All
Users"
or
Hold down the Windows key on the keyboard and press the "E" key
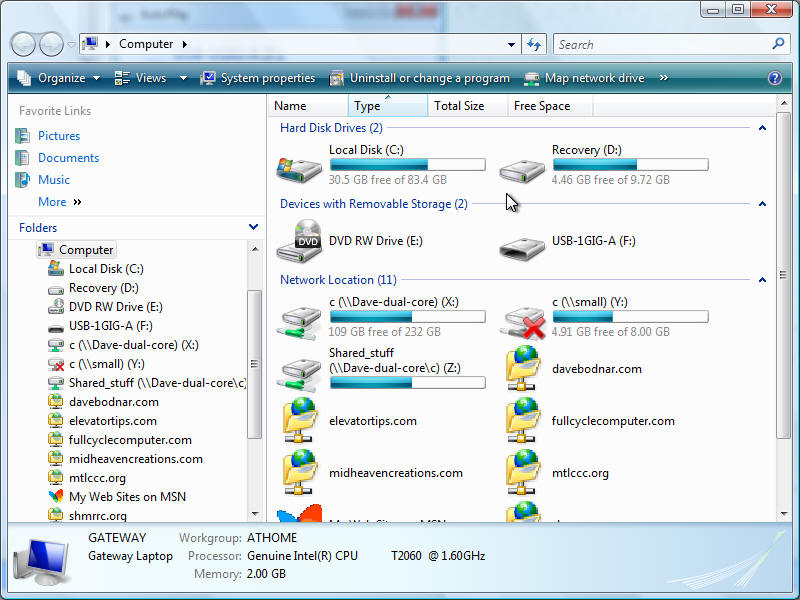
You should see a window something like the one below - this one is from Windows Vista. The USB memory stick is drive F:
This screen is from Windows XP. Here the USB drive is G:

My USB drive is labeled as F: on the Vista computer and G: on the XP one. The drive letter is arbitrary and is just the next drive letter that is available. The drive letter can change as you add or remove things from you system.
The USB drive contains all of the sound files that the MP3 Sound Controller will use. When you double click on F: (or G:) you see a partial list of files like the one below. Scroll down the right hand panel to see the whole list.
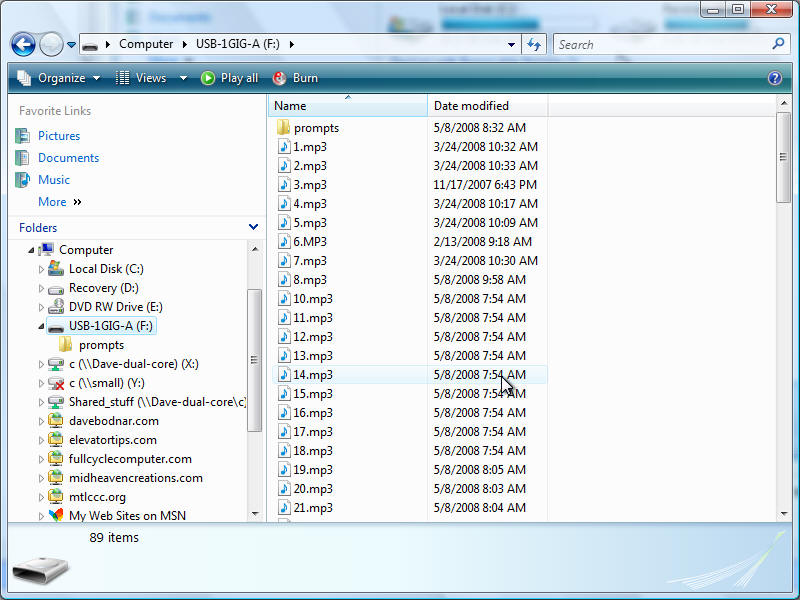
The folder at the top of the list is titled "prompts" and it contains the audio files that are used during programming of the unit. Do not delete, move or modify them or the voice prompts will not work. If you choose to work with another USB memory stick you can simply copy this folder to the new drive or just use the memory stick that has the prompt files while doing programming. The voice prompt files are not necessary for the unit to operate but they are nice while setting it up.
The other files, 1.mp3, 2.mp3 and so on, are the actual files that the unit will play when a switch is activated. 1.mp3 is the file that will be played when the first switch is in non-random mode. Similarly, the other single digit file names are associated with the other switches when in non-random mode.
The rest of the sound files, 10.mp3 through 89.mp3, are the files that are used during random play mode. When switch 1 is in random mode it randomly chooses one of the files from 10.mp3 through 19.mp3. Switch 2 uses 20.mp3 through 29.mp3 and so on.
As the memory stick is initially set up each of the files 10.mp3 through 89.mp3 contain a voice file that speaks the file number. For example file 56.mp3 says "file 56". This is used to confirm that the unit is working properly. You can delete these files or overwrite them with your own files. If you don't plan on using the random mode you can just ignore them and concentrate on files 1.mp3 through 8.mp3.
Programming the Controller for Random Sounds
As the controller is initially configured switches 1-6 are set to be non-random and switches 7 and 8 are set to choose random sounds. You will recall that this means that activating switch #1 will play sound file 1.mp3, activating #2 will play file 2.mp3 and so on. Activating switch #7 will have a randomly chosen file in the range 70.mp3 through 79.mp3 played and activating #8 will play something from 80.mp3 through 89.mp3.
To program the controller hold down both of the buttons until a voice prompt says "Programming Mode".
Release the buttons and the voice will say "Switch 1" then "not random". Press the Random button to change it to random. Pressing Random again will turn random off. Note that the green LED lights when the switch that is being programmed is set for random play.
To move to the next button press the Select button until the blue LED flashes rapidly then release it. The next button's number will be announced and you will be able to change it's random behavior.
After you go through the 8 switch settings the voice prompt will say "Programming completed" and the random settings will be written to memory so that they will be remembered even after the unit has been turned off.
This video shows how to use the Random and Select switches to set each of the switches so that they will play the same sound each time or a randomly selected sound.
(Right Click the video below and select "Play")
Managing Random Sound Files
When a switch is placed into random mode the controller will select one file from a group of 10 as described above. If you wanted to have 10 random station announcements activated by switch 1 you would save them as 10.mp3 through 19.mp3. If you only have two different announcements you could save the same file as 10.mp3, 11.mp3, 12.mp3, 13.mp3, 14.mp3 and 15.mp3. The other sound would be saved as files 16.mp3 through 19.mp3.
With 10 file choices you can also "weight" some sounds so that they play more frequently. If you had only 3 sounds that you wanted to play randomly when switch 4 was hit you could put the first file in 40.mp3 through 45.mp3, the second file in 46.mp3 through 48.mp3 and the last file in 49.mp3. That way the first file would play about 6/10s of the time, the second 3/10ths and the last only 1/10th of the time.
Leaving a sound file blank, or just not using the file name, will have the unit not play any sound at all from time-to-time when it randomly chooses the blank file.
Getting Sound Files
Sound files for the system are available from a variety of places on the Internet. You can also record your own.
I find most of my sound files by going to Google.com and searching for 'free sound file train' (leave out the ') or 'download free railroad sound mp3' or some combination of these searches.
Once you find a sound that you like the web page where it is located is likely to tell you how to download it. If not you can try right clicking on the sound file name and choosing "save link as" or "save target as". Select an appropriate place on your hard drive and save the file. Once it is downloaded you can find it with Windows Explorer and double click on it to play. If it has an MP3 extension, that is if it ends in ".mp3", it will play directly on the MP3 Sound Controller. If it ends in ".wav" or has some other sound format we may be able to convert it to MP3 with the editor (see next section).
Remember that we can easily edit sound files. If you find a long file that has a really good section that you want to use we can pull that part out and use it.
Once a sound is found and saved onto your computer all you need to do is to rename it with one of the numbered file names that the MP3 Sound Controller looks for. Copy that numbered file to the USB memory stick and you are ready to go!
If you want to clip, amplify or otherwise modify a sound file you need an editor. There is an excellent program that does all of that and more. The best part may be that the price is very reasonable: $0.00!
Audacity is the program and it can be downloaded from http://audacity.sourceforge.net/. The version I am using right now is 1.2.6. Download the appropriate version (PC or Mac) and install as directed.
While you are there make sure you also download the Lame MP3 Encoder: http://audacity.sourceforge.net/help/faq?s=install&item=lame-mp3. Audacity cannot export files in MP3 format without this encoder. Download the appropriate file. The PC version is a ZIP (compressed) file. Once it is downloaded double click on the ZIP file to extract the file that is needed: "lame_enc.dll" Copy this file into the same folder that holds the Audacity installation. On a PC it likely to be C:\Program Files\Audacity. When you first try to save an MP3 file you will be asked where the encoder is located. If you put it in the Audacity folder it is easy to find!
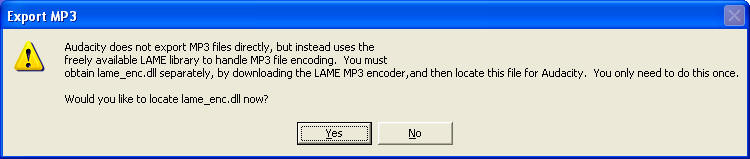
When this box appears just select "Yes" and locate the program where you saved it after downloading.
Note that there are downloads for both PC and Mac - I am basing my work on the PC version. I would expect that the Mac version is very similar.
Running Audacity
Before we start let's download a file from the Internet so that we are working with the same sound file. The file is available from http://www.a1freesoundeffects.com/vehicles.html . The file is called "Railroad Crossing" and is about 1/2 way down the page on the right hand side. Right click on the file and select "Save Target As" or "Save Link As". Make sure you take note of the file name (railroadcrossing.wav in this case) and where it is being saved on your computer. Some computers are set to save such files to the root of drive C:\ and others save to the desktop. Either way you will need to know where the file is to find it later on.
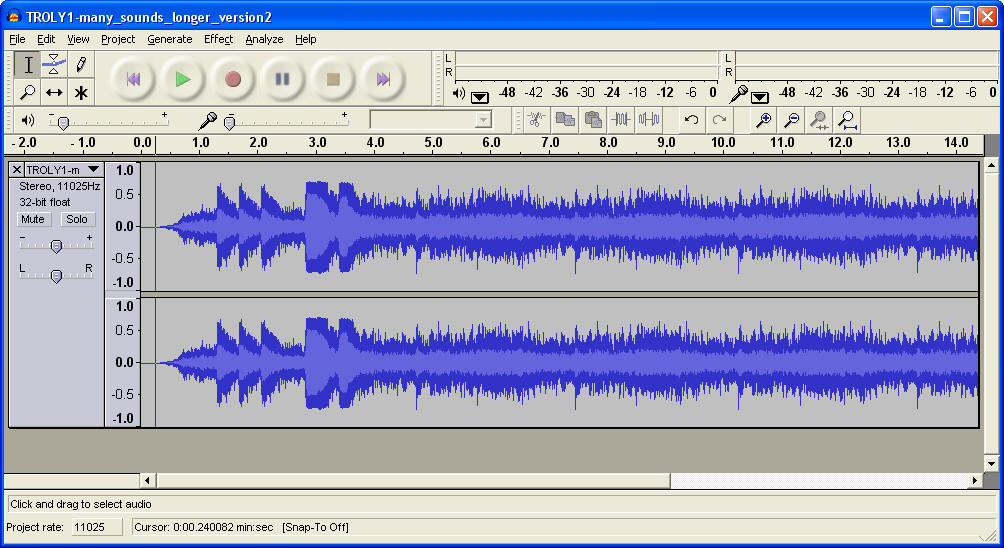
To start the editor click on Start / All Programs / Audacity. Next use File / Open to select a file to edit. Find "railroadcrossing.wav" and load it into the editor. On my computer it looks like this:
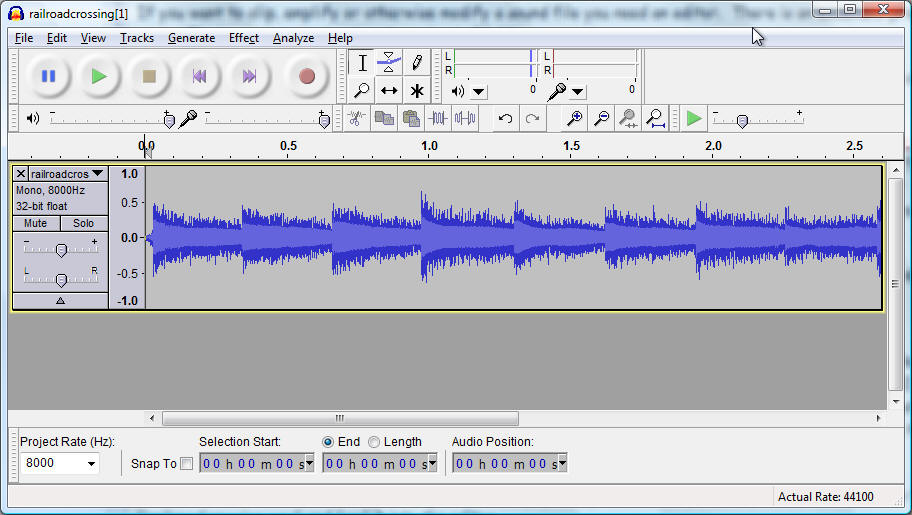
Click on the Play button (the large green triangle at the top) and you will hear the sound play as the cursor moves across the screen.
Exporting as an MP3 File
Audacity can deal with most audio formats but our Sound Controller can only handle MP3 files. To export your file as an MP3 load and edit the file as needed then follow these steps:
Click File / Export as an MP3...
Give the new MP3 file a name and select the folder where it will be saved - click Save.
Click OK to exit the next dialog box (no changes are needed).
The MP3 file will be exported - note that this can take some time depending on the file size and the speed of your computer.
Note: I usually save the file again right away with the numbered file name that I will use on the memory stick. Saving it again here saves me from renaming or duplicating it before I put it on the USB memory stick.
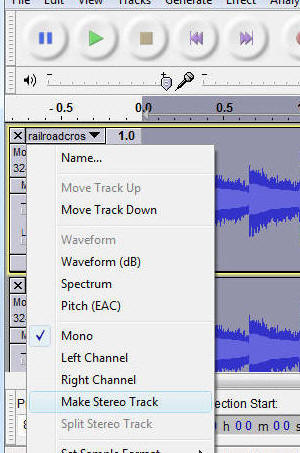
Sound Editor Tasks - Making a Monaural Sound into Stereo
The file we are working with is a monaural (mono) audio file. If you want to make it stereo, so that we can modify how it will play through both of the Sound Controller's speakers follow these steps:
Click Edit / Select / All
Click Edit / Duplicate - a second copy of the file should appear below the first
Click on the small drop down arrow just to the right of "railroadcros"
( it is the small black triangle in the center of this image)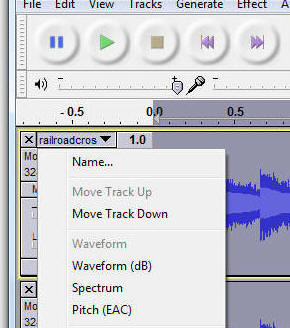
From the drop down list of options select Make Stereo Track
Sound Editor Tasks - Creating Sound for Only One Speaker
If you have a stereo sound file it will play through both speakers. Audacity can easily take that stereo file and change it into a file that will only play from one or the other of the stereo speakers. You might want to do this if you have the two speakers in two different buildings. Perhaps one in the saloon and the other is at the train station. You could have all of the dancing / partying sounds coming from the saloon speaker and the train arrival / departure sounds coming from the other speaker.
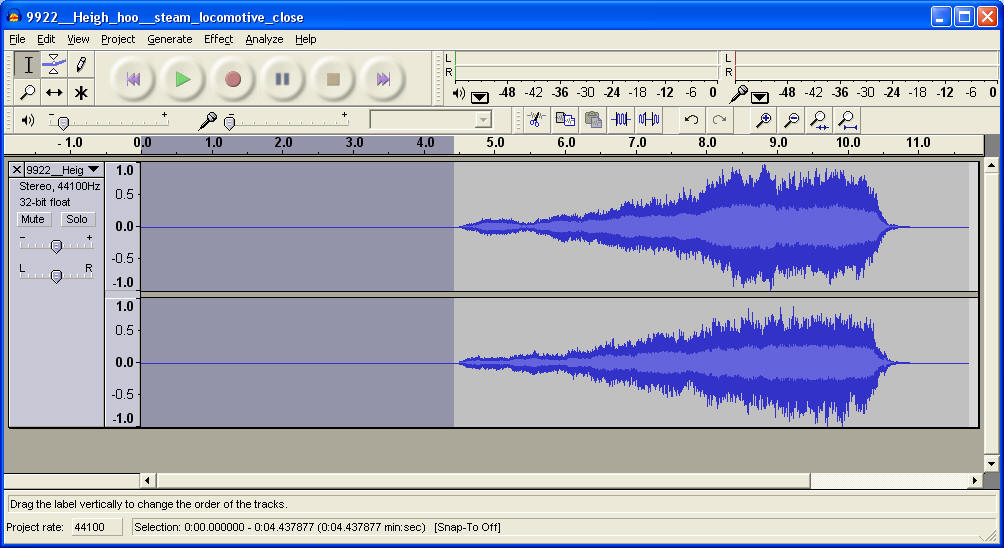
Here we have a stereo sound with the left channel track at the top and the right channel track at the bottom.
Find the Left Right slider at the far left of the screen.
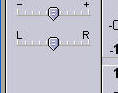
Move the slider all the way to the "L" position. That gives all of the volume to the left channel and no volume to the right channel.
Note that nothing changes on the screen!
Export (save) as an MP3. Call it something like 7left.mp3 so you remember what you did.
Next move the slider all the way to the right. Export as 7right.mp3.
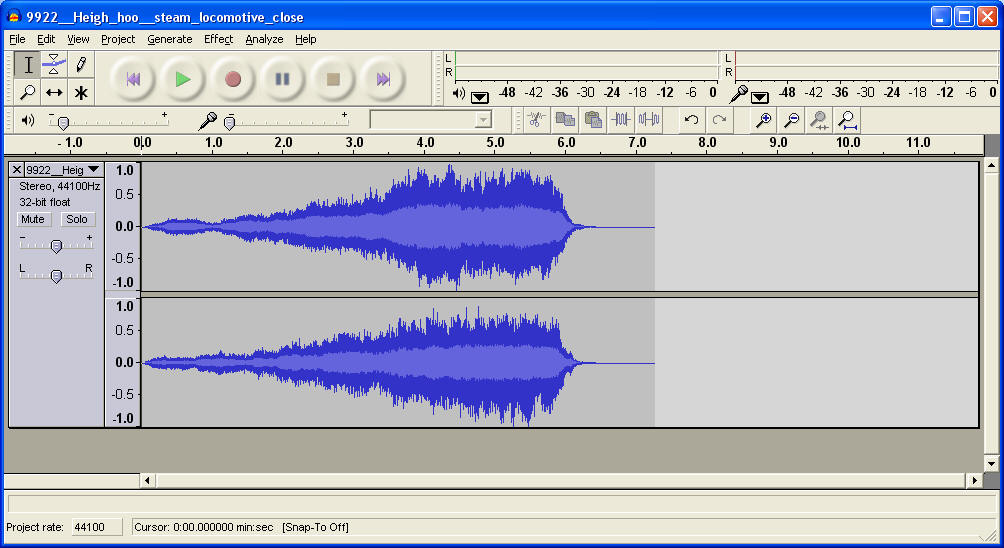
Now open 7left.mp3 and note that there is nothing in the
bottom box, the right channel. If you open 7right.mp3 you will see
that the reverse is true.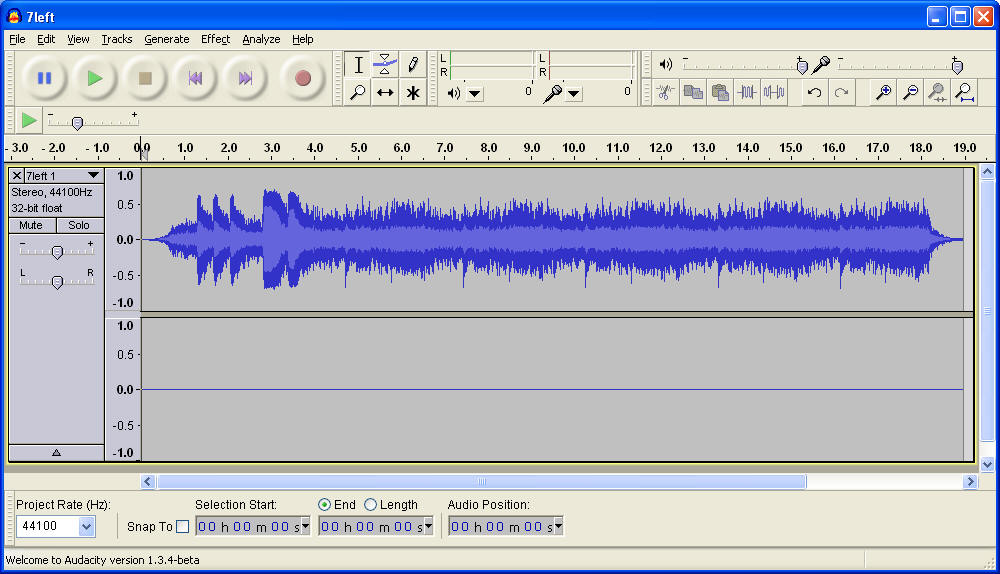
Sound Editor Tasks - Changing Volume
If you want to amplify part or all of a sound file follow these steps:
Load in the file that you wish to change
Highlight the section that needs amplification - in
this example file the entire sound is too low so we'll amplify most of it.
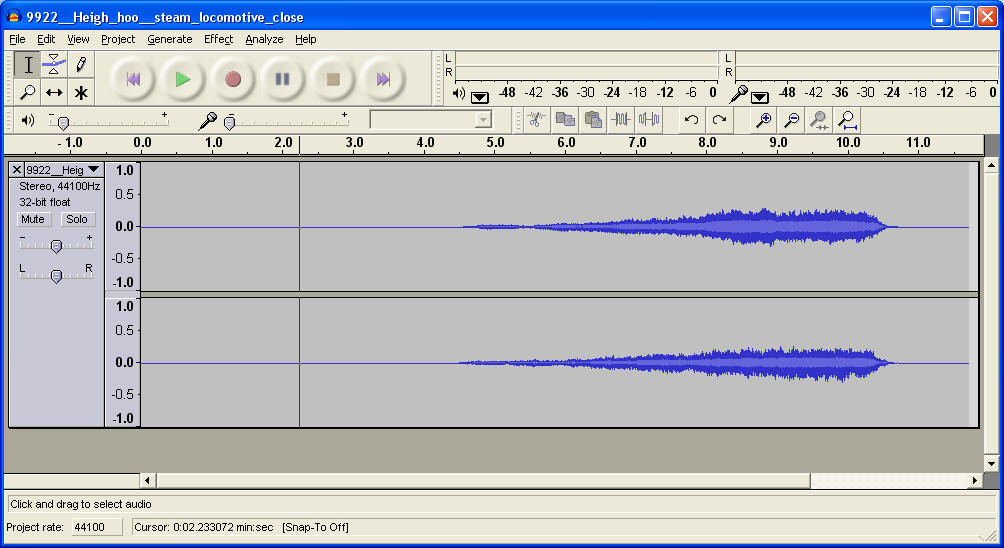
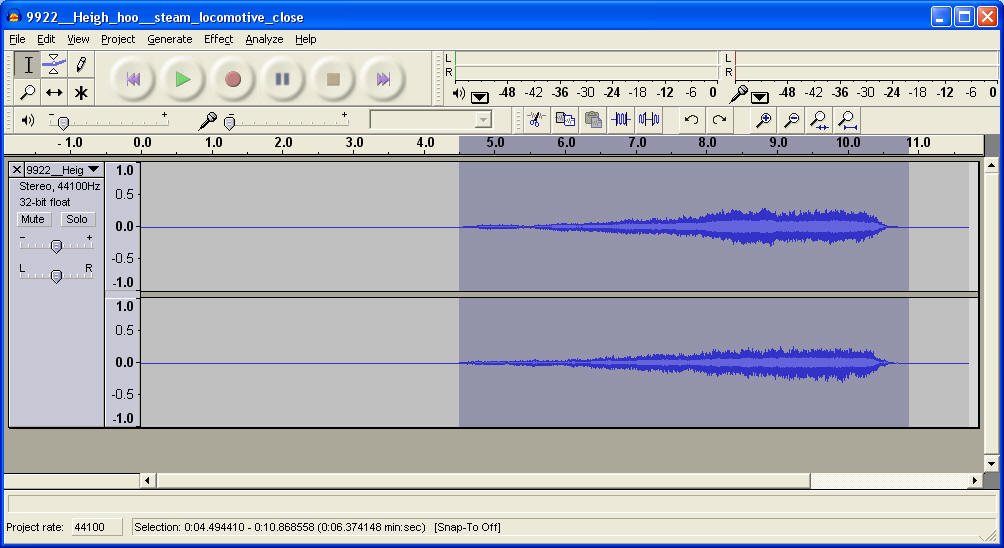
Highlight the part of the file that you want to
amplify by placing the cursor at the start of the area, holding the mouse
button and dragging the mouse to the other end before releasing the button.
(If you wish you can use the keyboard to highlight the section you want to
change. Click the mouse at the beginning point, hold the Shift key and
then hold the Right Arrow key to highlight the section. Release both
keys when done)
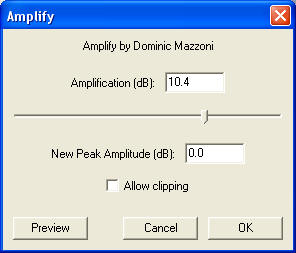
Click Effect / Amplify...
The program will estimate the maximum amplification that can
be done without
clipping and fill in that number. In this case it is 10.4 dB. Accept its recommendation and click
OK
The change will be made and displayed
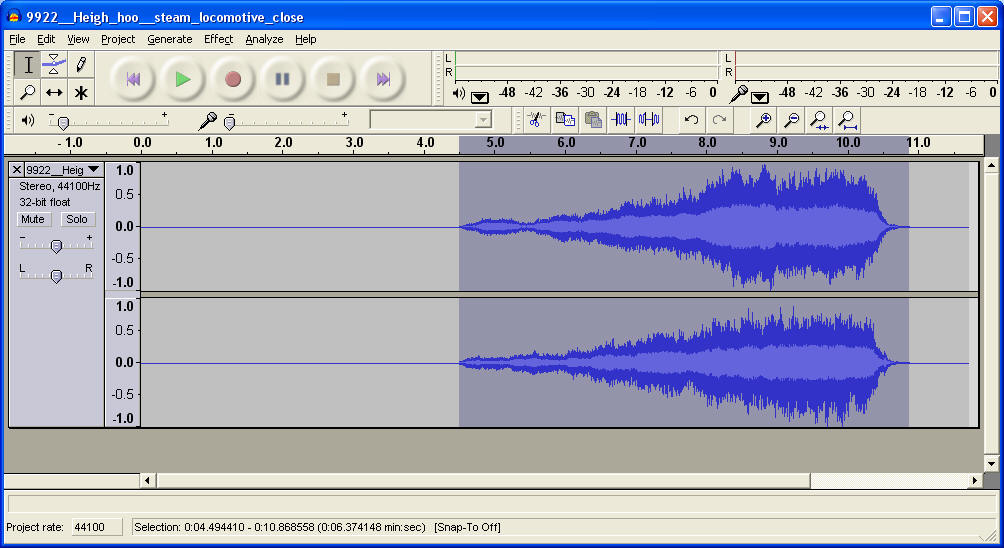
Test the file change by playing it. It should be considerably louder.
Remember that there is an Undo under Edit - an easy way to back up should you make an error or change your mind!
Sound Editor Tasks - Selecting a Section of a Sound File (also called Cropping)
In the file above there is a good deal of silence at the start and some at the end of the file. Let's remove it so that just the sound that we want remains.
Use the mouse or mouse & keyboard to highlight the silent area to the left of
the sound
Click on Edit / Delete in the menu or just press the Delete key on the keyboard to remove the
highlighted section
Try deleting the silent area to the right
Test by playing and don't forget the Undo command!
Recording Your Own Sounds with a Microphone
Audacity does a great job of editing sounds but it will also allow you to record your own sounds with a microphone. Plug a microphone into you computer. Follow these steps to record your voice.
Tip: You can quickly export a section of a sound file by highlighting just the section you want to make into an MP3 and clicking File / Export Selection as MP3. That will make an MP3 file that contains just the highlighted section.
Using Music
You can load music files into Audacity just like any other WAV or MP3 file. There are any number of railroad songs in the public domain that can be found on the Internet.
Video Tutorials
In order to get you off to a good start with Audacity I have created two short tutorials. They show you step-by-step how the program is used.
The first video shows how to start Audacity, load a file, make some minor changes and then export the file as an MP3 that can be used in the MP3 Sound Controller.
The second video is a bit more advanced and shows how a monaural sound can be changed to stereo. It also shows how the sound can be modified so that the stereo speakers make the sound appear to move past you from one side to the other.
Other Thoughts
The unit would be great on any home or club layout but it is also a natural for temporary layouts that we put together at various venues.
There is also a version of the unit that works much the same way as what is described here but without track side mounted switches of any kind. Instead it is operated by an 8 channel wireless remote control.
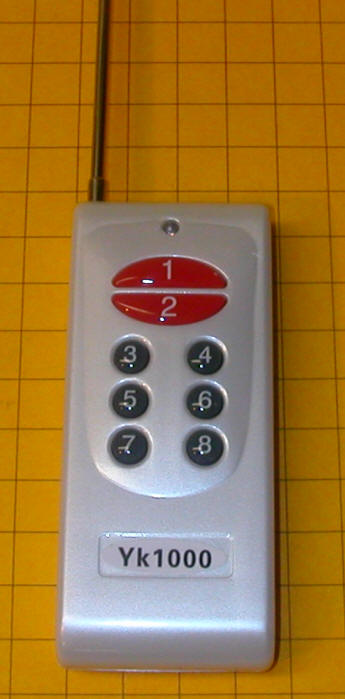
This allows you to trigger any of the eight fixed or random sounds by pressing a button from anywhere on your layout. In an open area the range is hundreds of feet!
Please contact me if you would like to give this very capable unit a try or have any other ideas for the MP3 Sound Controller.
If this article has gotten you thinking of some other application just remember that I like nothing more than customizing units to meet individual needs! (dave@davebodnar.com)