| While researching another controller I ran
across an interesting device that had a color display and ...
... could be ordered with a wireless remote control.
The description on Ali Express indicated that it had a number of programmable options that might be fun to explore.
|
| POWER FOR THE CONTROLLER Some sort of DC power supply is needed for this controller. A number of options and wiring details are in the first section of the original web page linked here: http://www.trainelectronics.com/PowerController/
|
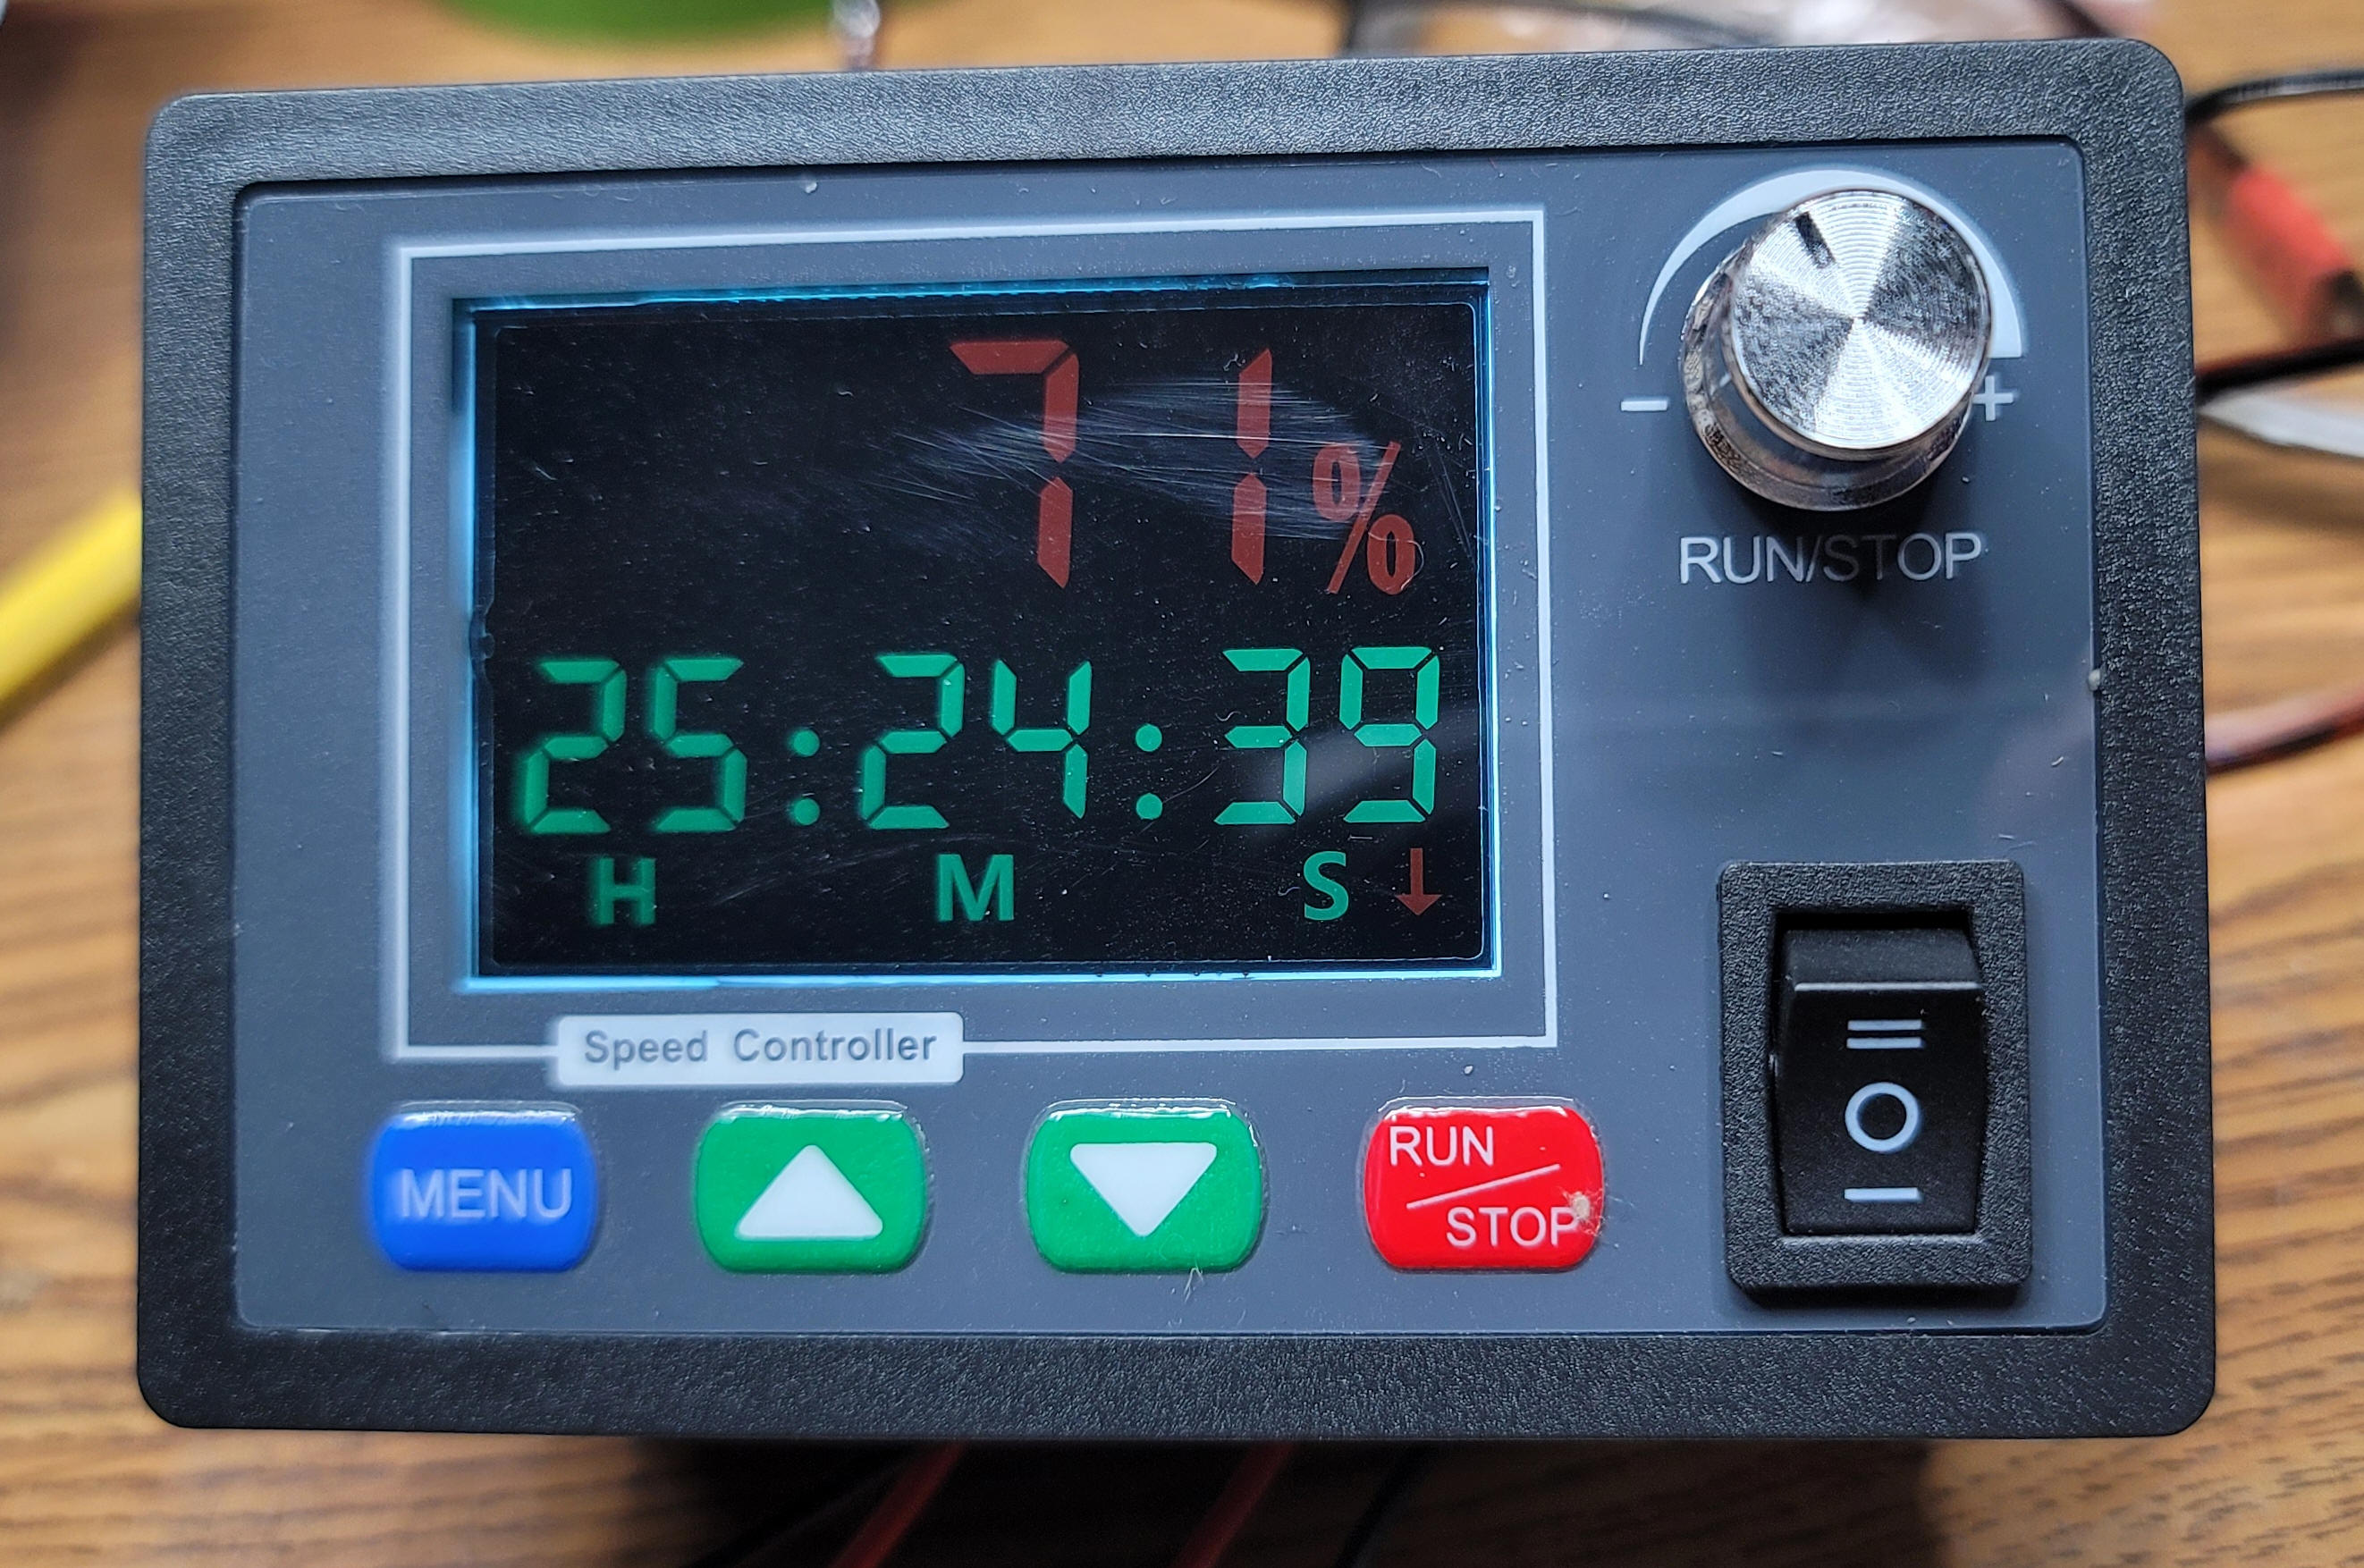
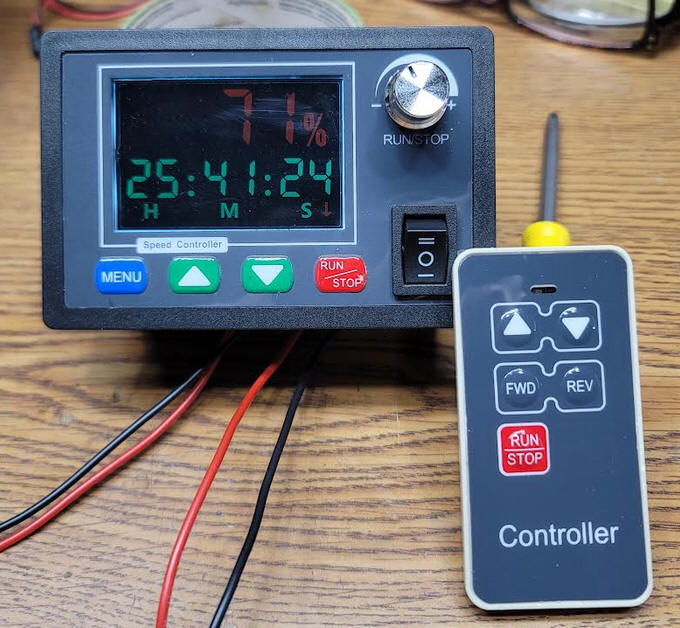
CONTROLLER WITH REMOTE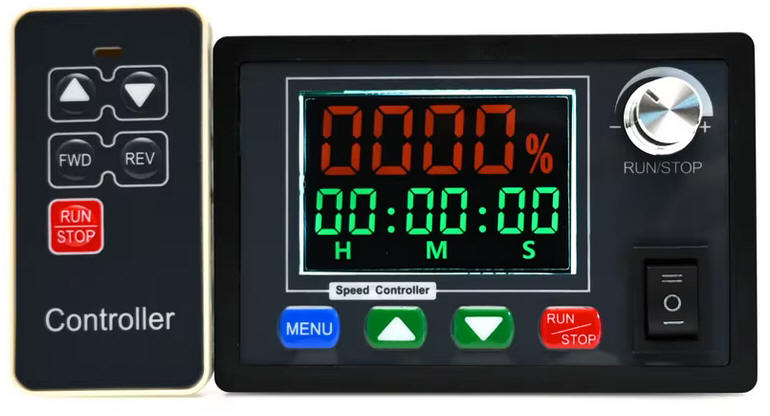 The second controller is available from eBay and AliExpress and may be on Amazon at some time. The price varies from about $20 to $30 with the remote control and less without. |
| Linking Remote When delivered the remote will not work as it needs to be linked to the controller unit. To link them follow these steps:
1. Start with the power removed from the
control unit |
| Restore Factory Settings To restore all settings and disconnect the remote hold the MENU button for 6 seconds |
| Setting Speed The unit can be reversed with either the toggle switch in the lower right corner or with the remote control. It will remember the speed that was used for each direction. All you need to do is adjust the speed while going in one direction then reverse the motor and set the other speed. |
| Settings The controller has a number of settings that can be adjusted. To enter into the setting mode just press the MENU button |
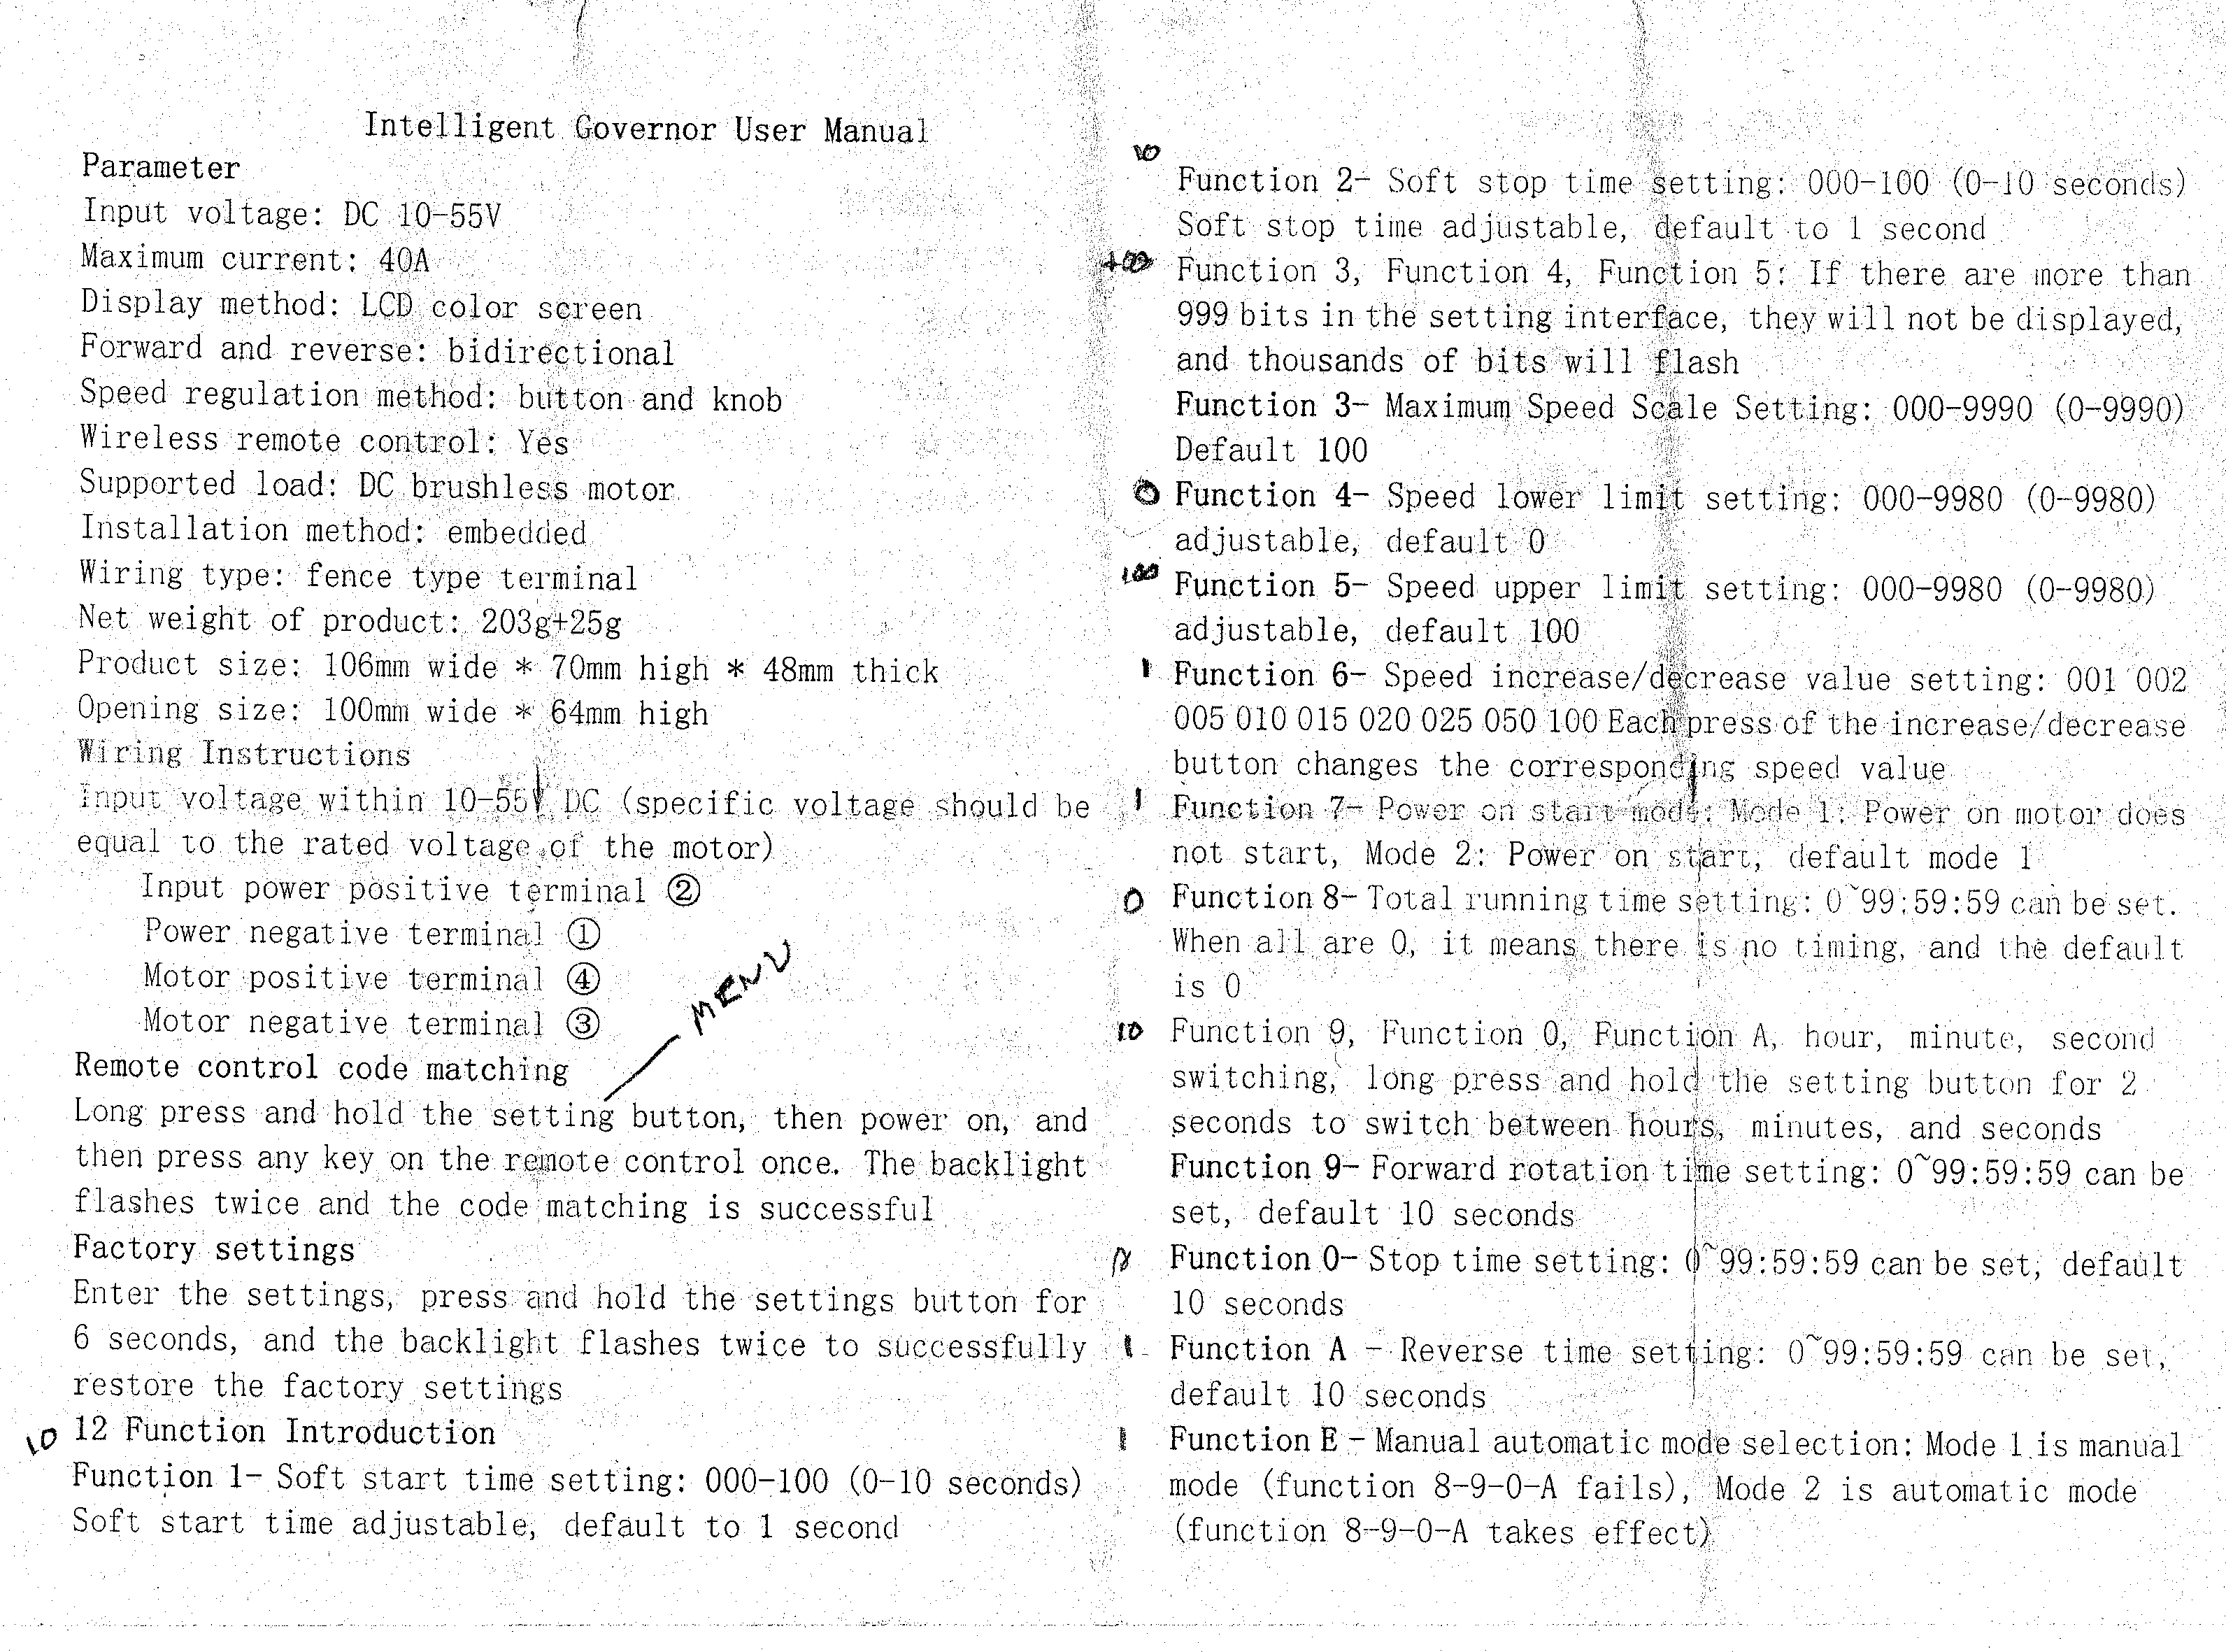
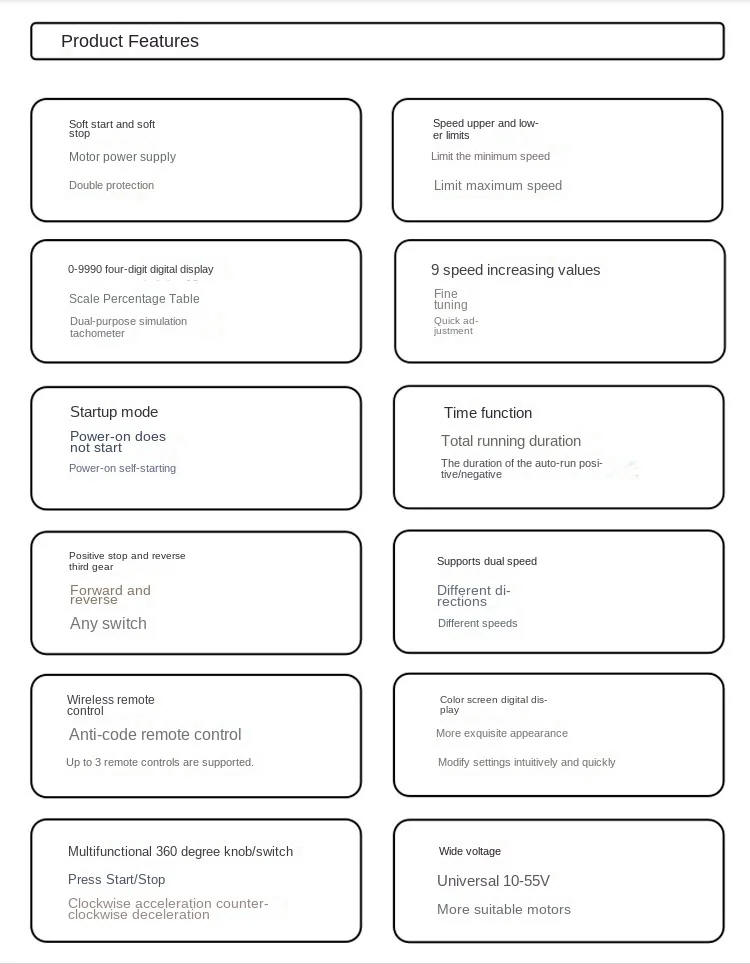
| Function #1 - SOFT START The first function will be displayed showing a 1 and a number between 0 and 100 - this is the time (in 1/10's of a second) for the soft start. That means that the motor will take that number of seconds to go from full stop to full speed. Note that the value is in 10ths of a second so the range is from 0 to 10 seconds |
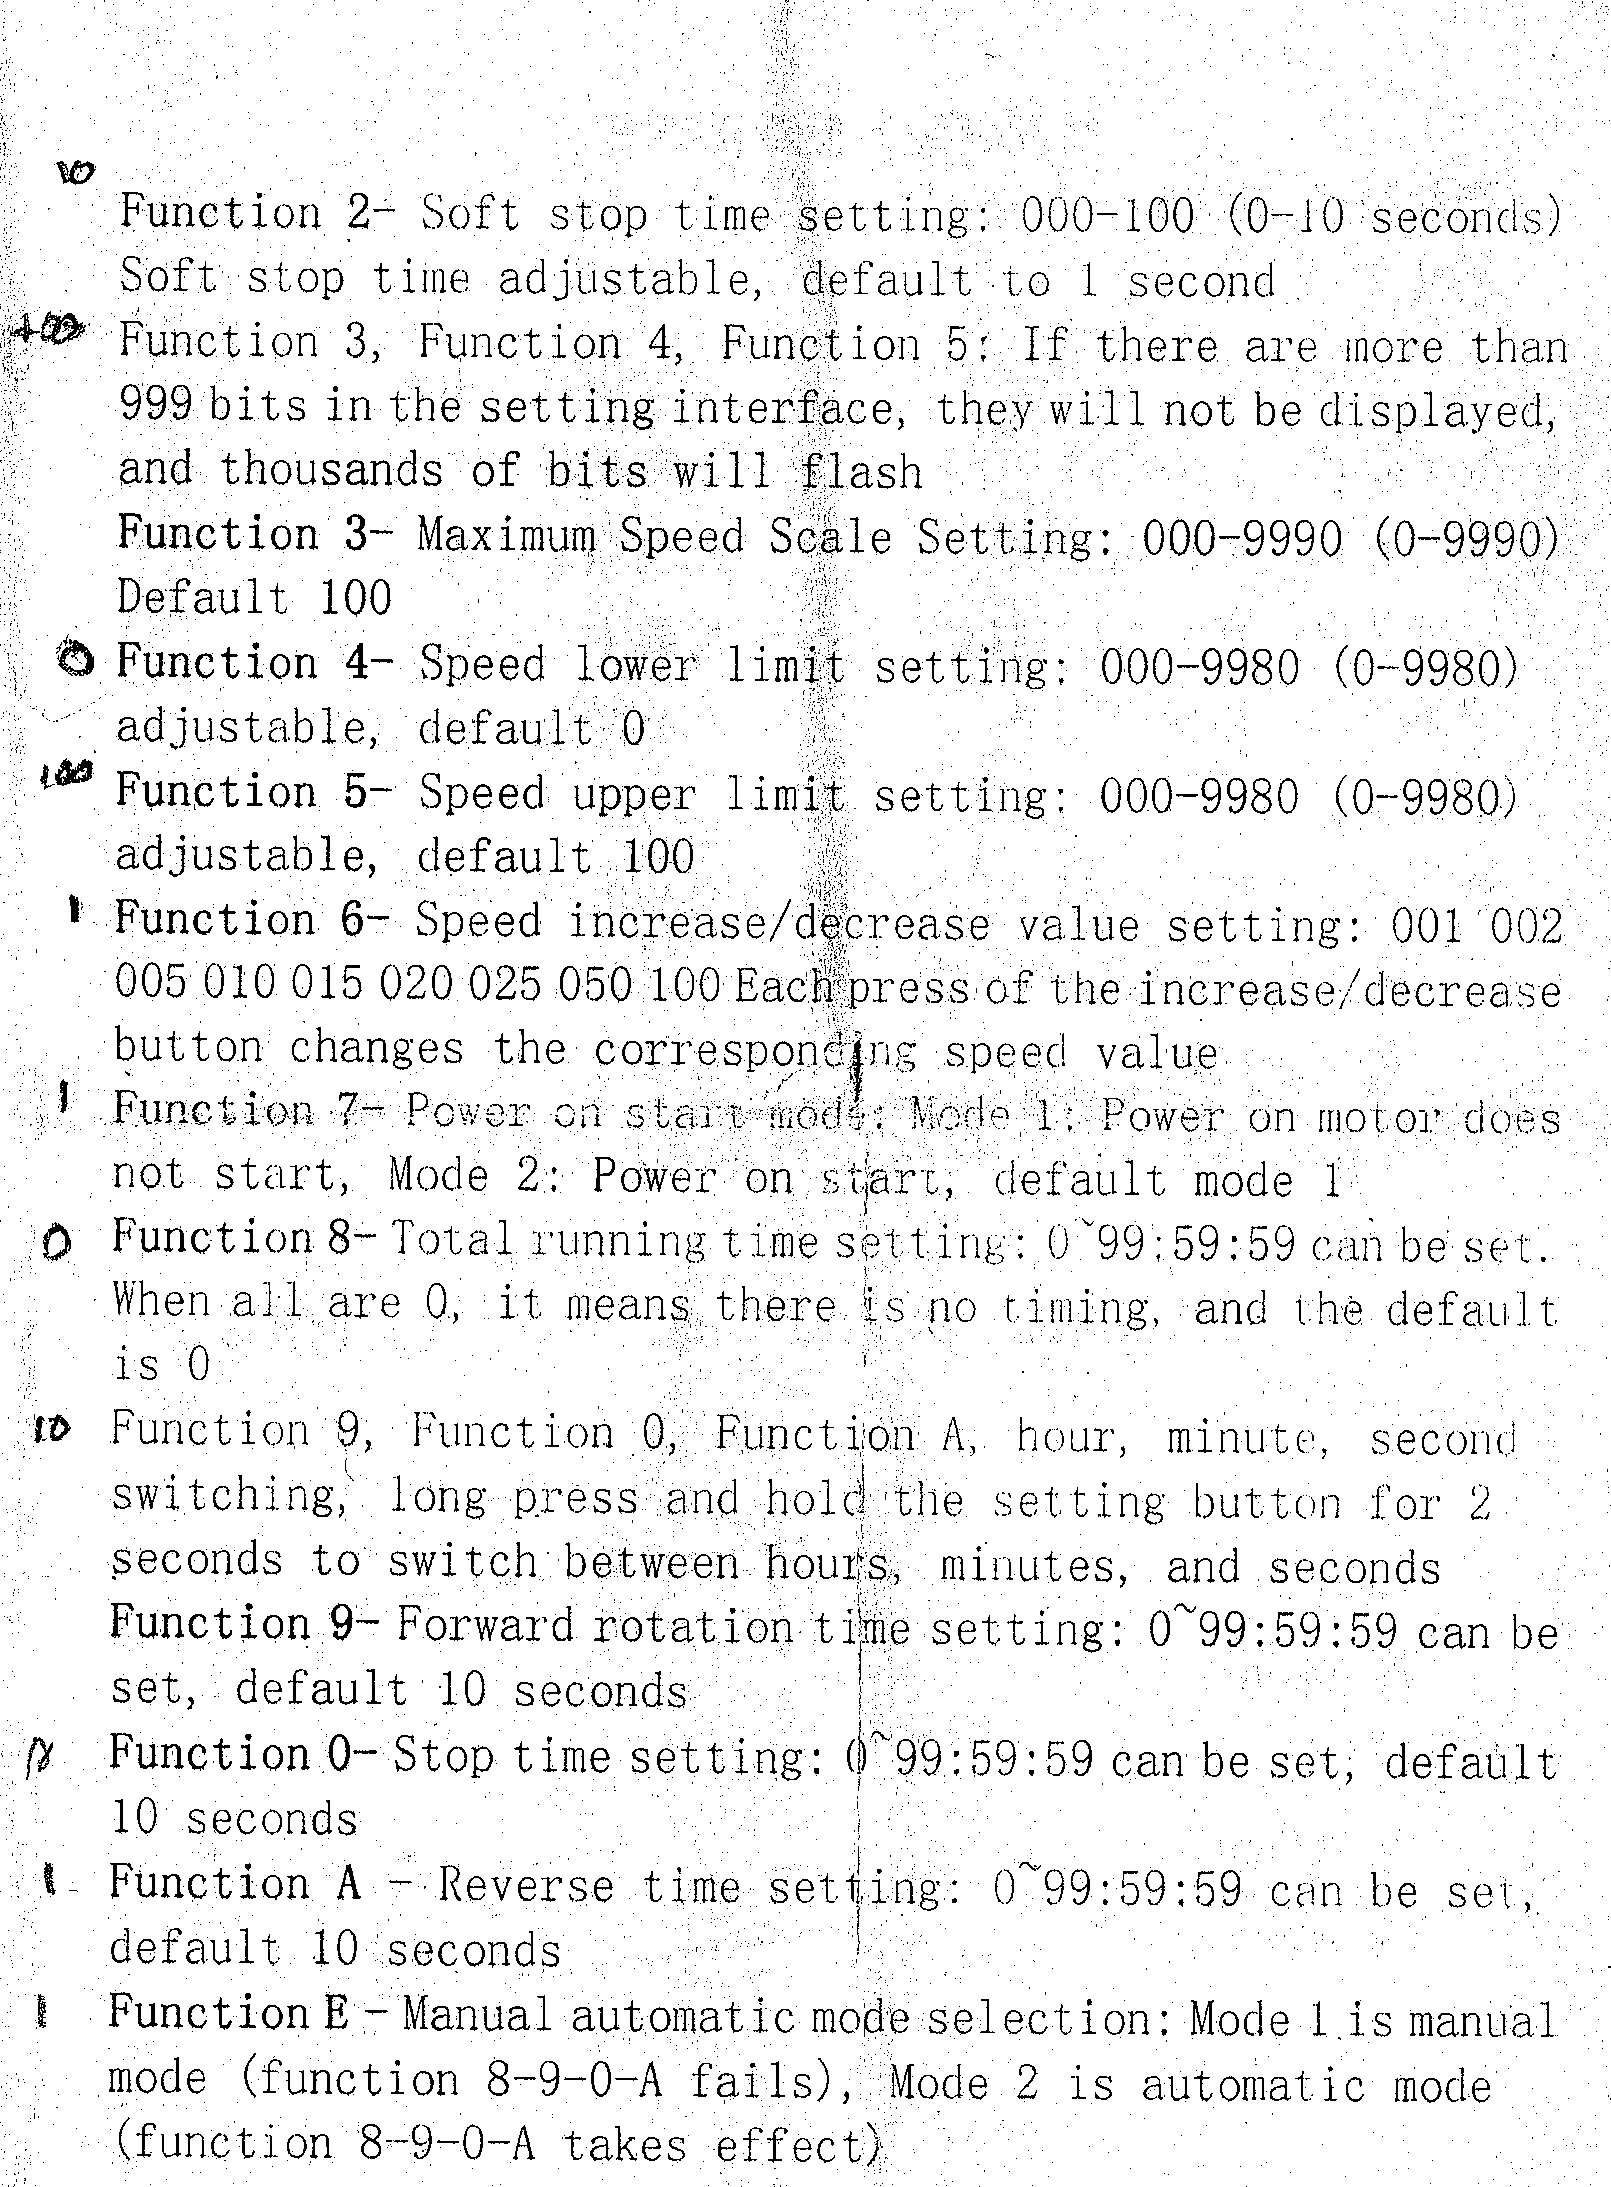
| Function #2 - SOFT STOP The second function will be displayed showing a 2 and a number between 0 and 100 - this is the time (in 1/10's of a second) for the soft stop. That means that the motor will take that number of seconds to go from full speed to full stop. Note that the value is in 10ths of a second so the range is from 0 to 10 seconds |
| Function #3 - NOT SURE Not sure what this is - any ideas??????????? |
| Function #4 - Lower speed limit Sets the lower speed percentage. For example, if set to 25% the lowest speed that can be selected is 25%. |
| Function #5 - Upper speed limit Sets the upper speed percentage. For example, if set to 75% the highest speed that can be selected is 75%. |
| Function #6 - Speed steps Chooses the steps that are used for the speed adjustment. For example, if set to 1 setting speed goes up or down by 1's. If set to 10 it goes up or down by 10's |
|
Function #7 -Auto-start on power-up or not If you have the automatic mode set (Function E), this function can be set to 1 or 2. If set to 1 it will not start the motor when first powered up. If set to 2 it will start the motor when power is applied |
|
Function #8 - Stop motor after set time This function sets the total time that the motor will run before being shut down - if set to 0 (zero) the motor will run until stopped by removing power or using the stop button |
|
Function #9 - Forward run time - See
"setting time" below This function sets the forward rotation time (if #E is set to 2) |
|
Function #0 - Backward run time - See
"setting time" below This function sets the backward rotation time (if #E is set to 2) |
|
Function #0 - Stop Time - See "setting
time" below This function sets the time that the forward rotation time (if #E is set to 2) |
|
Function #A - Reverse time setting -
See "setting time" below Sets the time between going in one direction and reversing to the other (if #E is set to 2) |
|
Function #E - Manual or Automatic Operation If set to 1 operation is manual. If set to 2 operation is automatic. Set to 2 to have the motor run and reverse based on earlier settings This is ideal for running a point-to-point trolley on a model railroad. |
|
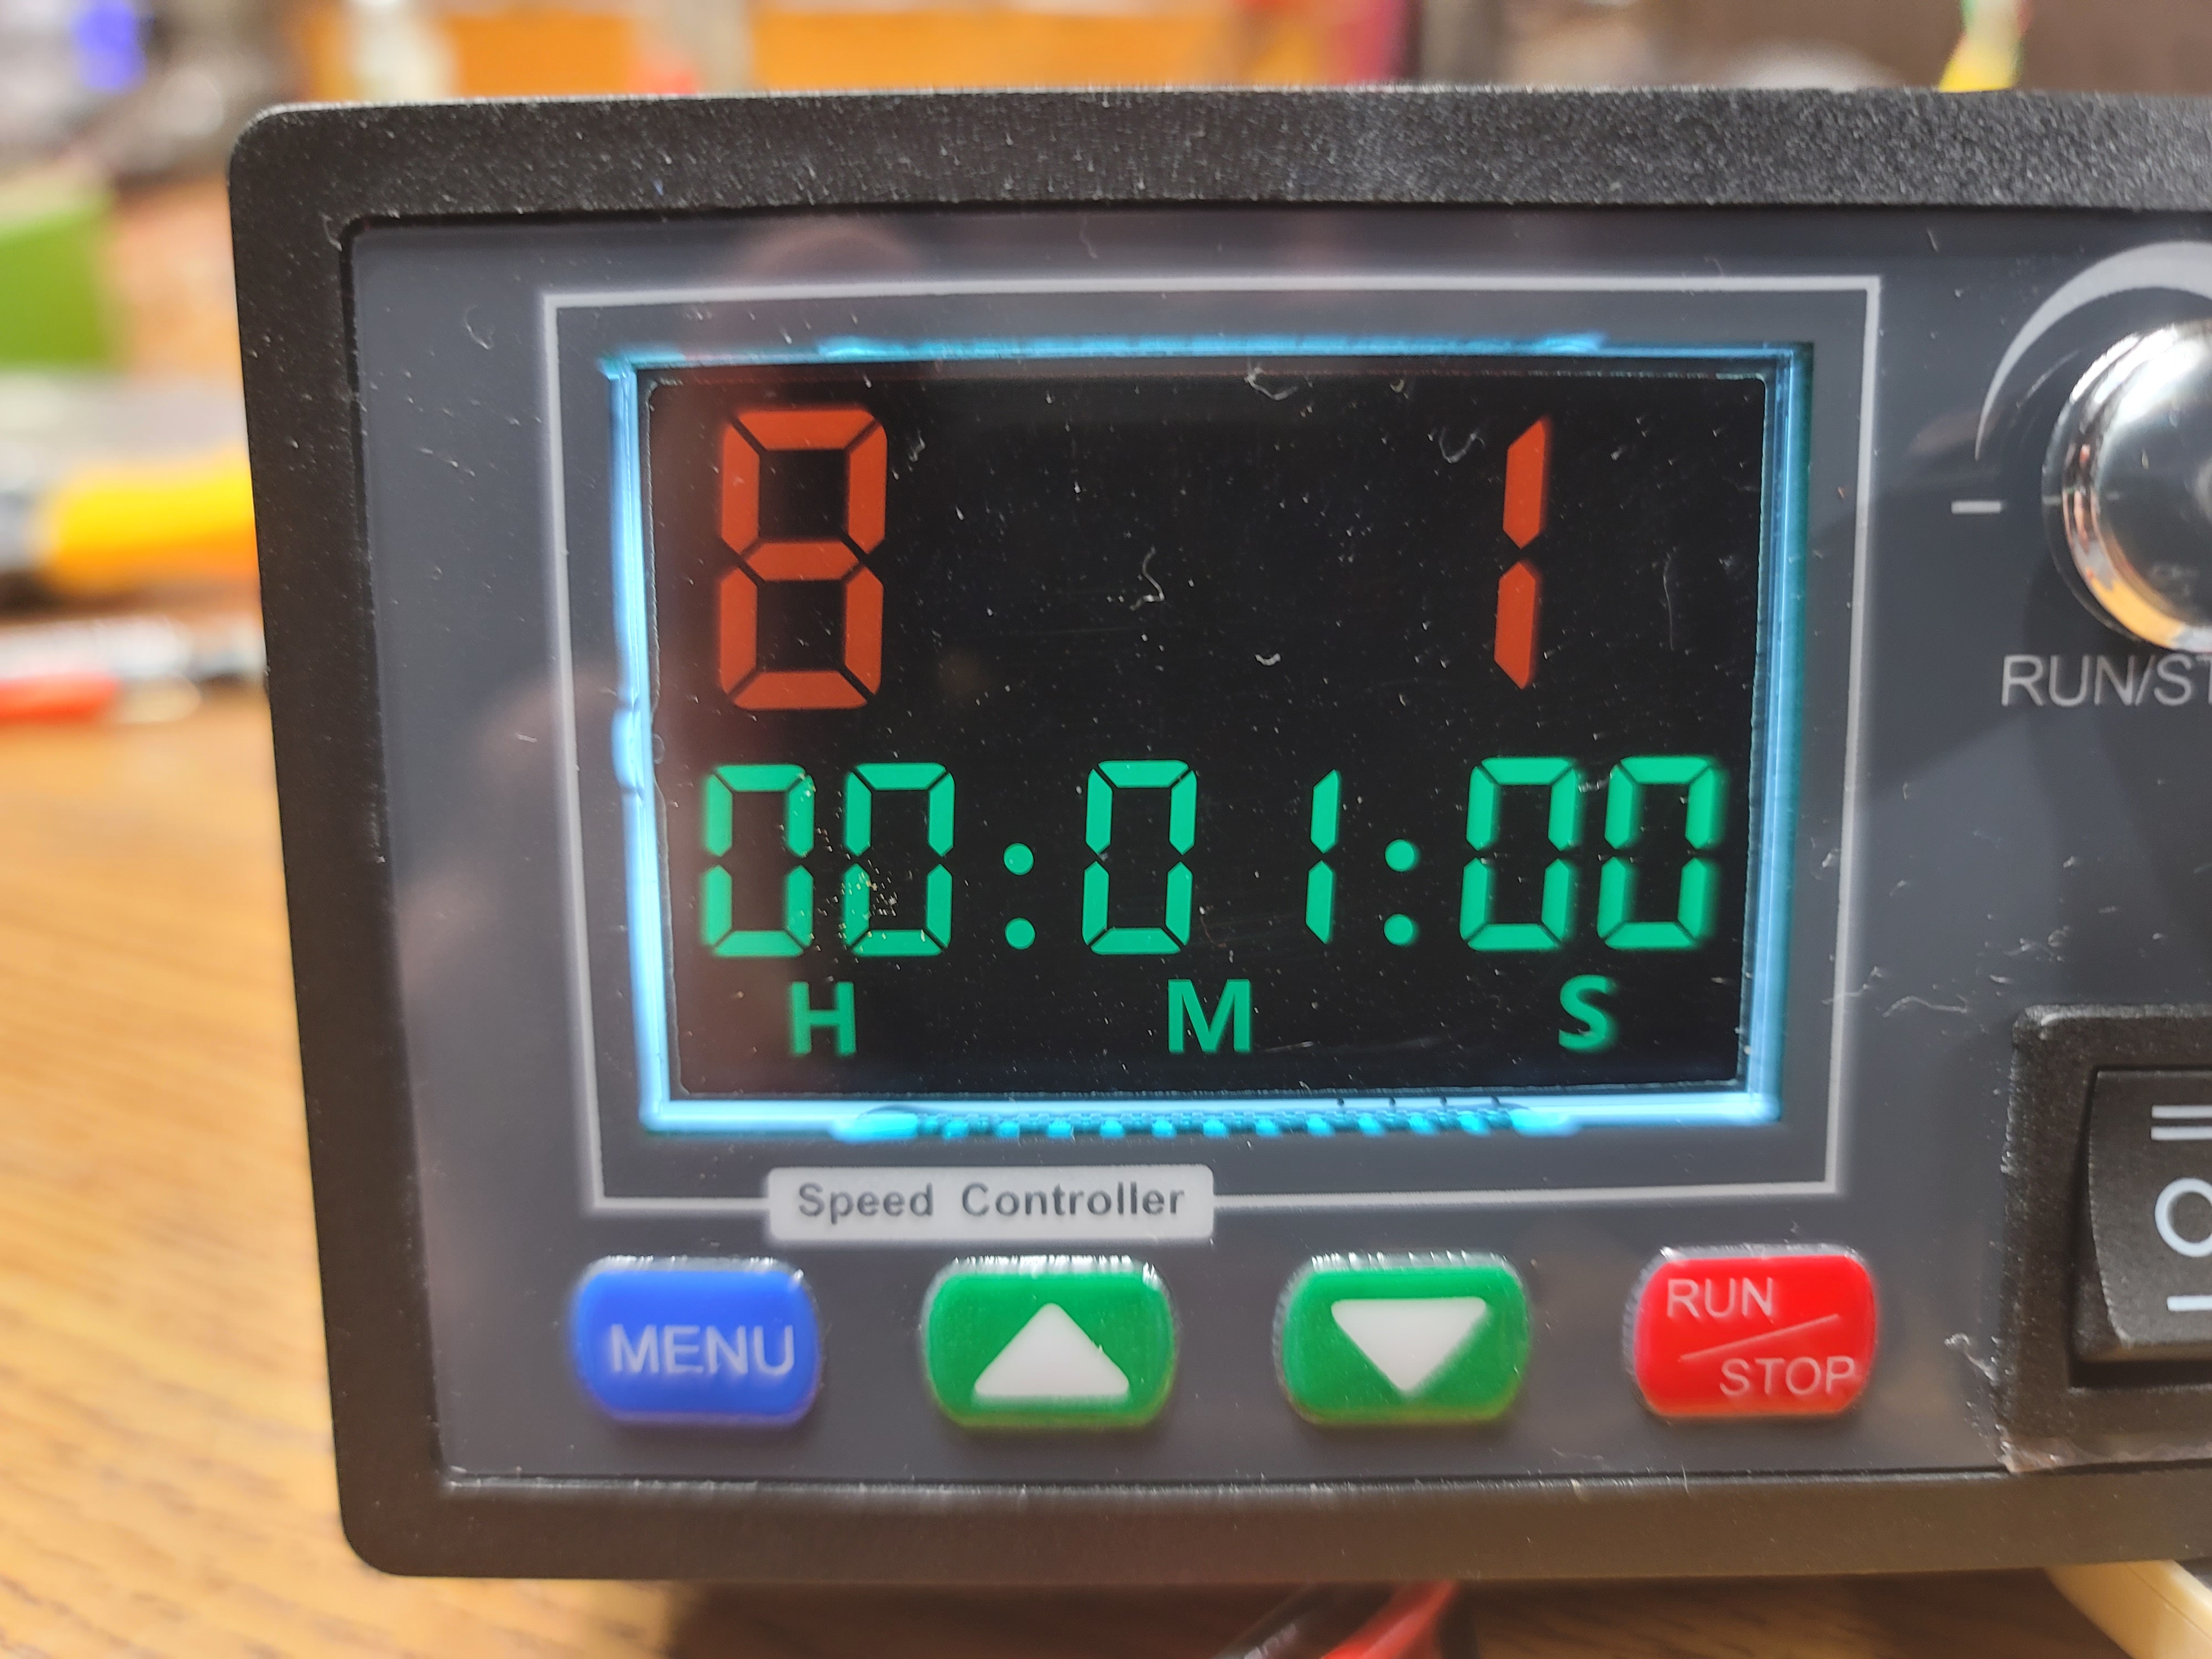
Setting Time A number of functions require setting time. The display is similar to the image below. A time up to 99 hours, 99 minutes and 99 seconds can be set. This photo
shows a time setting of 1 minute. To change a setting note
that the Hour, Minute or Second indicator is flashing.
|
|
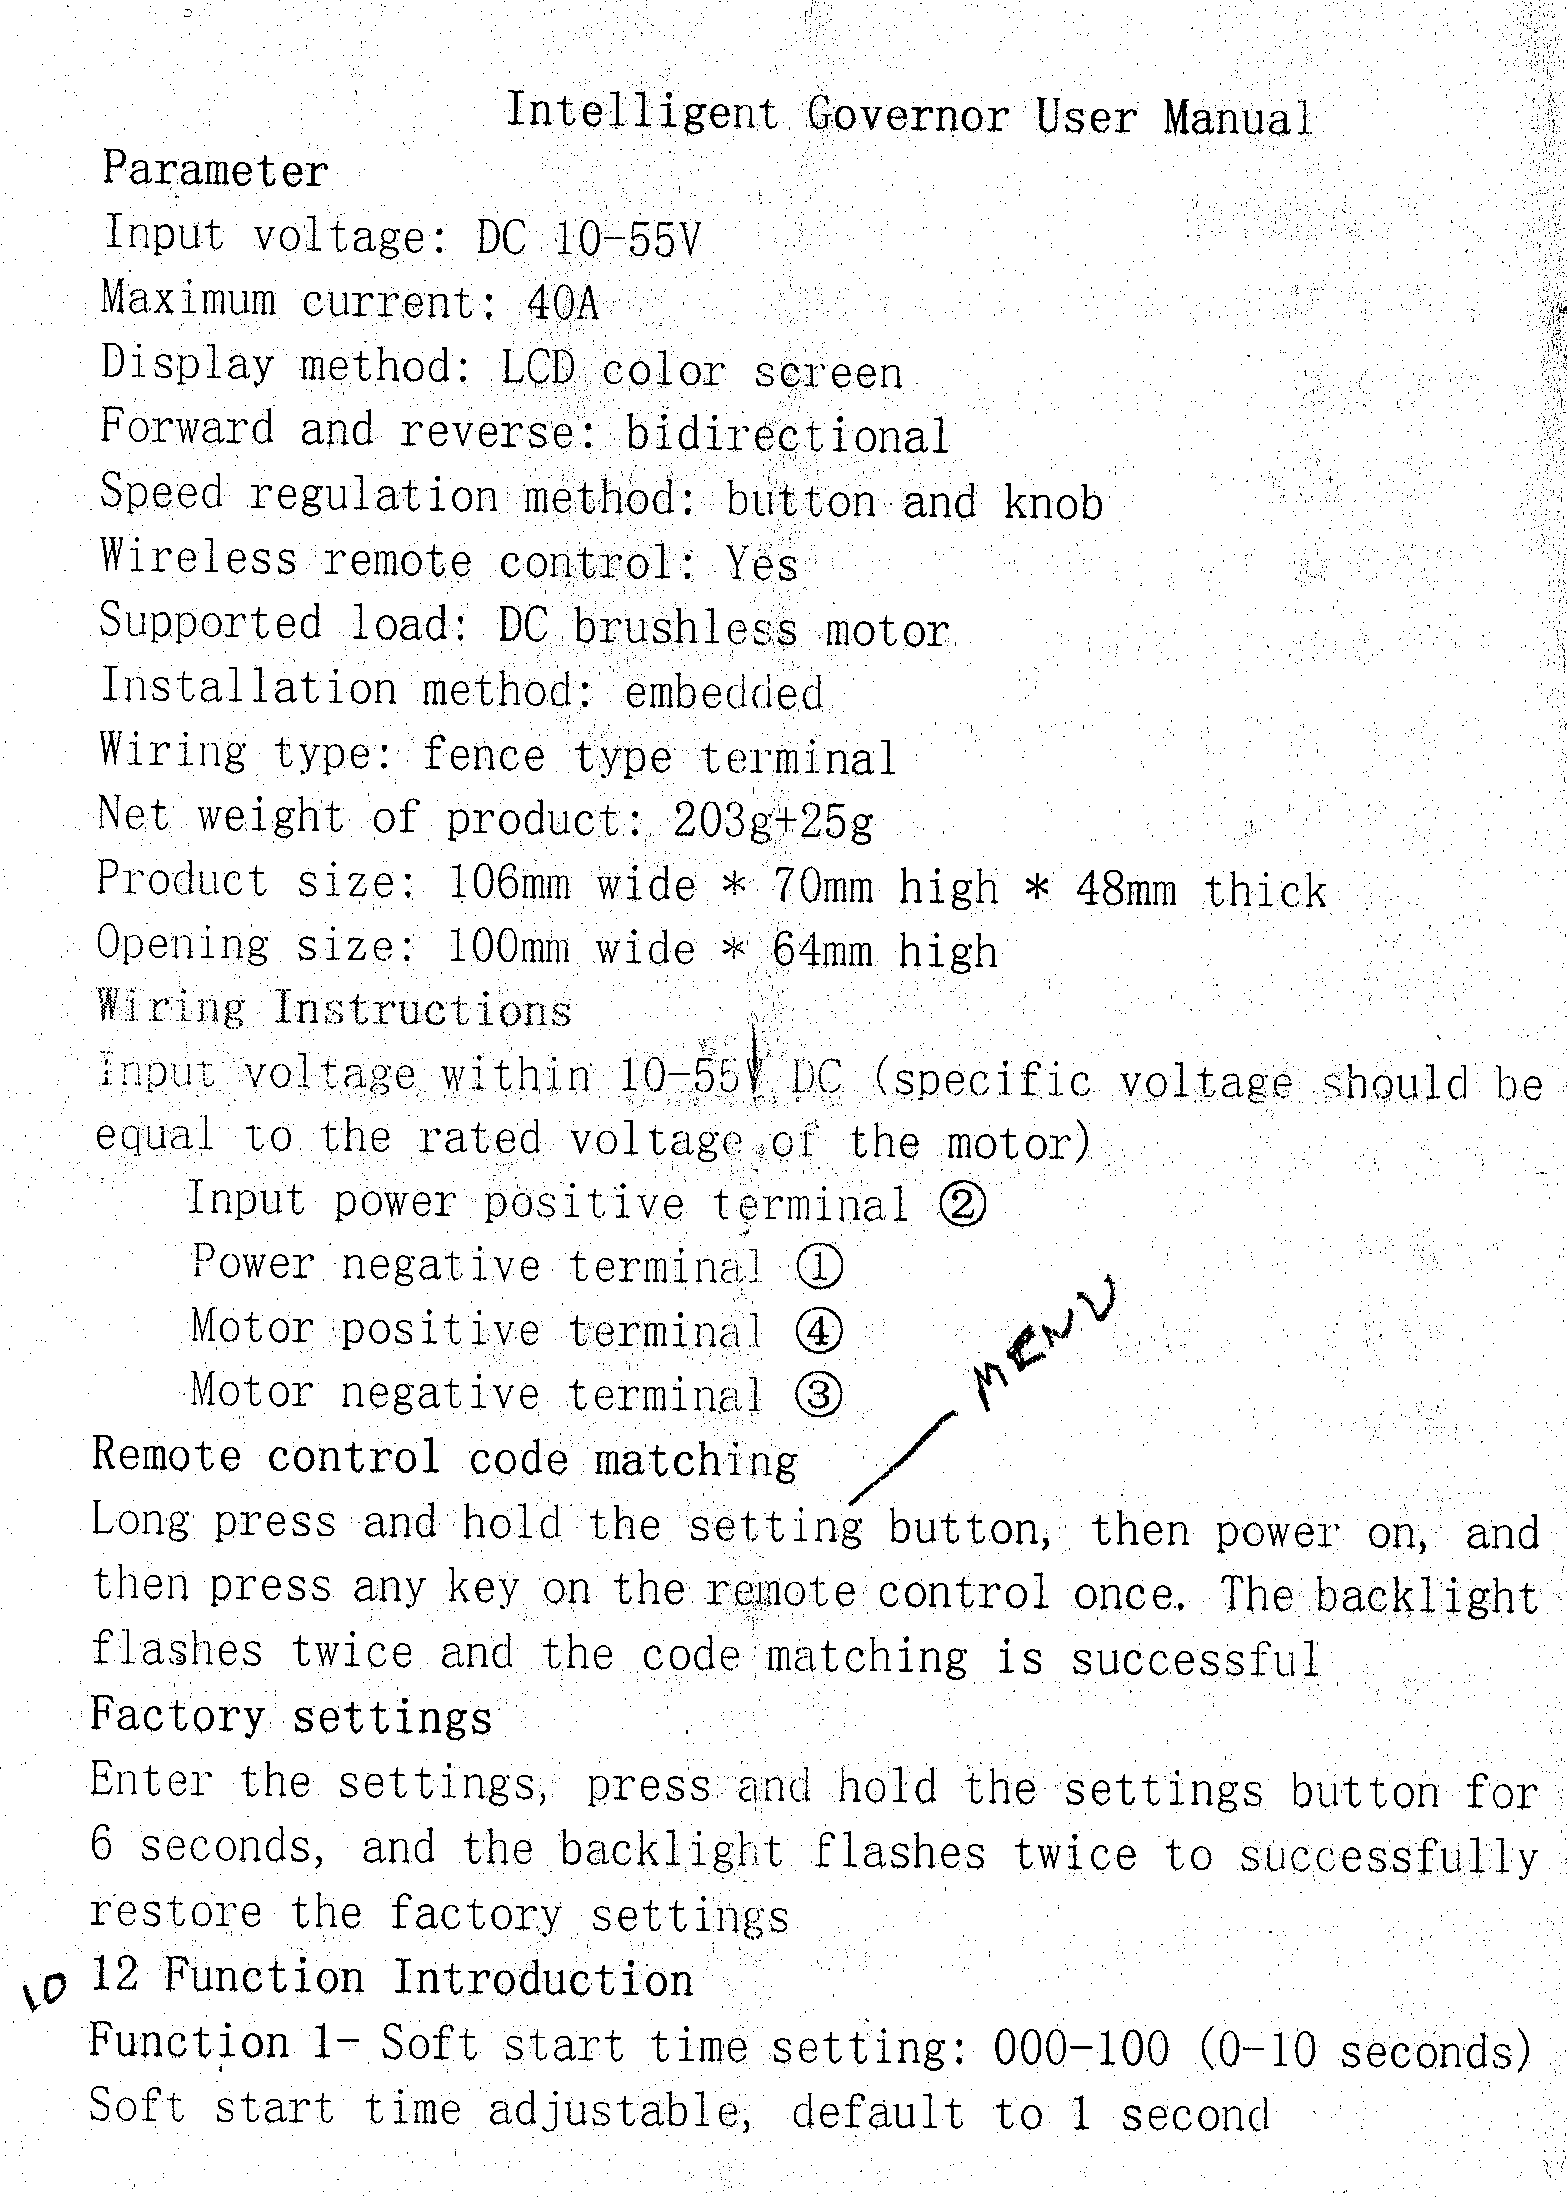
Description
Parameter |
 |
 |
 |
 |
| Close - from https://www.aliexpress.us/item/3256804696887637.html?gatewayAdapt=glo2usa4itemAdapt 9 Functions are described as
follows To set the speed limit, long press the MENU key to enter the
setting key surface, short press to switch to the function. 3 Press
the add and subtract keys to set the size. Press RUN/STOP to save
and exit
|
|
NOT exact - from https://www.icstation.com/remote-control-governor-15khz-speed-limiter-smart-display-p-15980.html
4.Function Settings:
1).Function 1:Slow start time
setting
1.1).Percentage setting
range:0-100%,time range:0-10 seconds adjustable
1.2).Press the MENU button
once to enter the function 1 setting button surface,press the
plus and minus keys to set the time,long press MENU to save and
exit (10% is 1 second,100% is 10 seconds).
2).Function 2:Slow stop time
setting
2.1).Percentage setting
range:0-100%,time range:0-10 seconds adjustable
2.2).Press the MENU button
twice to enter the function 2 setting button surface,press the
plus and minus keys to set the time,long press MENU to save and
exit (10% is 1 second,100% is 10 seconds)
3).Function 3:lower limit of
speed setting
3.1).Percentage setting
range:0-80%
3.2).Press the MENU button 3
times to enter the function 3 button surface,press the plus and
minus keys to set,long press MENU to save and exit.
4).Function 4:Speed upper limit
setting
4.1).Percentage setting
range:0-100%
4.2).Press the MENU button 4
times to enter the function 4 button surface,press the plus and
minus keys to set the size value,long press the MENU button to
save and exit.
5).Function 5:Acceleration and
deceleration value setting
5.1).Speed
value:1%,2%,5%,10%,15%,20%,25%,each time you press the plus or
minus key,the speed will change accordingly.
5.2).Press the MENU button 5
times to enter the function 5-key interface,press the plus and
minus keys to switch,long press MENU to save and exit.
6).Function 6:Motor running time
setting
6.1).Time setting range:1
second - 99 hours 59 minutes 59 seconds
6.2).Press the MENU key 6
times to enter the function 6 key surface,the default is the
maximum time of 99 hours,59 minutes and 59 seconds,
the RUN/STOP key switches hours/minutes/seconds,and press plus or minus to adjust the size of hours/minutes/seconds.Press MENU to save and exit.
7).Function 7:Motor stop time
setting
7.1).Time setting range:1
second - 99 hours 59 minutes 59 seconds
7.2).Press the MENU button 7
times to enter the function 7 button surface,the default is the
maximum time of 99 hours,59 minutes and 59 seconds.MENU save and
exit.
8).Function 8:Motor start and
stop cycle times
8.1).Cycle times:1-999 times
8.2).Press the MENU button 8
times to enter the function 8-key interface,the default is a
maximum of 999 times,press the plus and minus keys to
adjust,long press MENU to save and exit.
9).Function 9:with or without
timing option
9.1).0:no,1:yes
9.2).Press the MENU button 9
times to enter the function 9-key interface,the default 1 has
timing function,0 has no timing,press the plus and minus keys to
switch,long press MENU to save and exit.
10).Long press the RUN/STOP key
to turn off the backlight.
5.
|