Give your Railroad A Voice
Part I
Synthesized Train Sound Boards
Rev 1-25-05 AM (12-29-10)
Installing sound generating
electronics in large scale engines, rolling stock and buildings adds to the
realism and enjoyment that comes from garden railroading.
Ever since I started developing my railroad I have kept an eye out for
electronic sound modules that could be used on my system.
I have installed sound boards from Locolinc,
ITT SOUND BOARD
Several years ago I found a reasonably priced board from Innovative Train Technology (www.ittsound.com). It utilized recorded digital sounds and would generate two different sounds from one $29.95 module. I installed it on a diesel switcher along with a pair of track triggered reed switches and had both a bell and a whistle at a very reasonable cost. Unfortunately the folks at ITT have discontinued these dual sound modules as the chips to manufacture them are no longer available. You can still get bells and whistles and scores of other sounds from ITT but they all now cost $29.95 each.
OTHER SOUND OPTIONS
Being something of an electronic tinkerer I have been collecting and experimenting with a number of inexpensive alternatives that can provide sound on my layout. A quick Googol search or trip to eBay (search for “train sound kit” or “train sound module”) turns up several different sound board options.
Here is an overview of the boards I have purchased and an evaluation of each one.
FOUR TRAIN SOUND BOARD #1
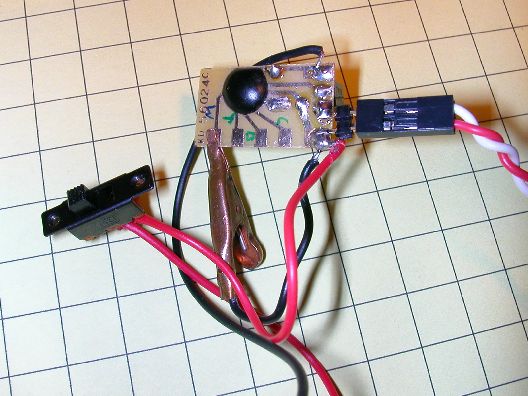
One of the most commonly found offerings is typically called: Four Train Sounds. It consists of two small boards, one containing a blob of black epoxy covering a small integrated circuit that creates the sounds. The other board supports a one transistor amplifier and connections to the switches that activate the individual sounds. There is quite a broad range of prices that one can find for this board. The best I have found is from Marlin P. Jones at: http://www.mpja.com/category/MPJA_Kits/4_TRAIN_SOUND_GENERATOR_KIT_6101_KT.asp where the kit sells for less than $6.00 in single unit quantities.

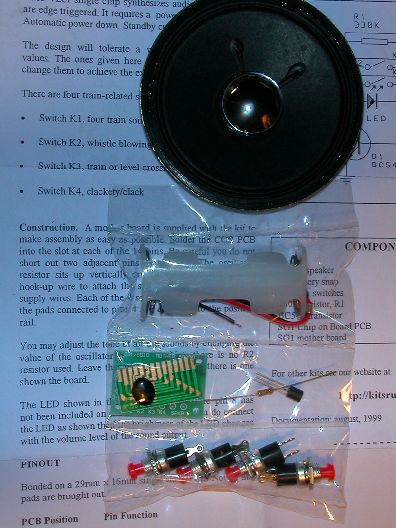
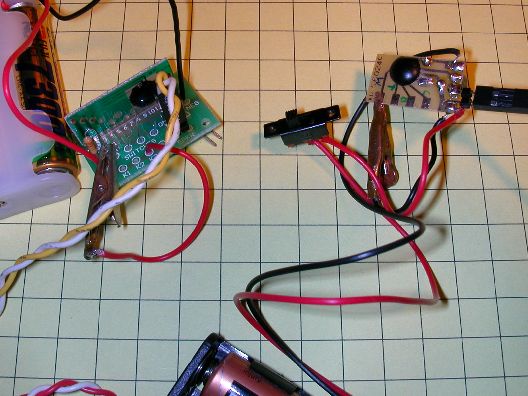
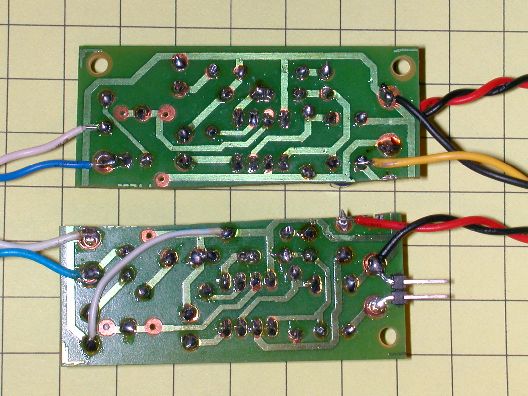
This kit includes everything but batteries. The instructions are clear and assembly can be completed in less than 15 minutes with little more than a soldering iron and wire cutters. First solder the two boards, the COB (chip on board) board and the motherboard, together. Make sure that solder bridges do not short out adjoining connections.
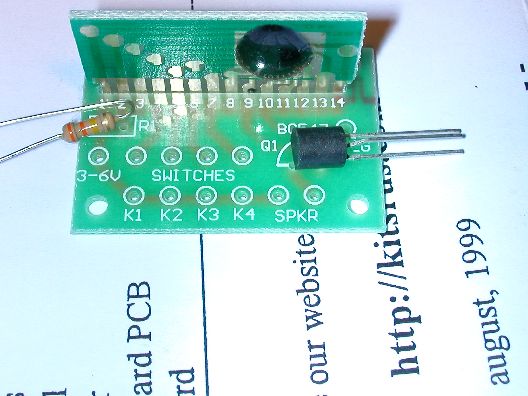
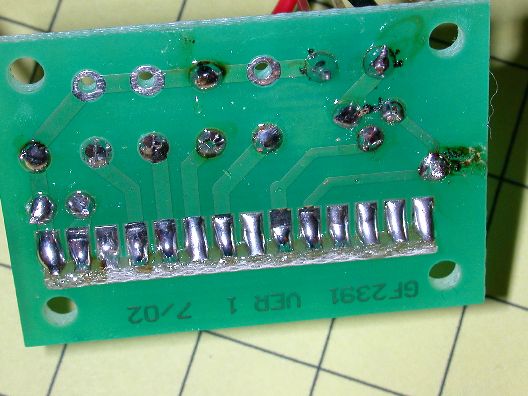
Next solder the oscillator resistor and transistor amplifier to the motherboard. The direction of the resistor does not matter but the transistor must be inserted as shown in the directions. Once soldered clip off the wire leads that extend from the back of the board. Finally connect the speaker, battery holder and sound activation switches to the board. Note that in the picture below I was testing the board and did not install the switches but just short lengths of wire to which I clipped a lead to give me a continuous sound. I also added pins for the speaker output to facilitate testing with a variety of speakers.
Take note of where the center lead (the base) of the transistor passes through the circuit board. This is where we will get an audio signal to feed into an external amplifier later on in the article.
Before inserting two AA cells in the holder double check the wiring, especially the battery connections as reversed polarity can quickly destroy the chip. Press each push button to hear one of the sounds.
Note: the links below will play MP3 files that I made from each of the sounds on this board. These recordings were made by placing a microphone near the sound board’s speaker. Nothing has been done to modify or enhance the sound. The recording is the sound that is produced by one button push. If the button were held down the sounds would continue until the button is released.
The switch connections are labeled K1 through K4. The sounds they produce are:
K1 – Four Sounds - the sounds described below are played along with a 4th sound that cannot be individually accessed: the whistle sounds 3 times, engine chuff sounds 9 times, crossing bell 8 times and “click-clack” sounds 12 times. Once this button is pushed the sequence can’t be stopped other than by removing power.
K3 – Crossing Bell - sounds 8 times if the button is pressed once – holding the button keeps the bell going until it is released
K4 – Click-clack – pressing the button once produces 12 “click-clack” sounds – holding the button keeps the sound playing until the button is released
The oscillator on the main board that determines the speed of the sounds is controlled by the 330 K ohm resistor. If you feel that the sounds would be better if they were faster you can lower the value of the resistor. The easiest way to experiment with this is simply to touch the two leads from a 100 K or larger resistor to either side of the 330 K resistor as a sound is being produced. When contact is made the speed of the sound, and its frequency, should increase. Similarly, putting another resistor, try 100 K again, in series with the 330 K will slow things down. You could also replace the 330 K resistor with a 500 K potentiometer to give a continuously variable speed.
With the exception of the
whistle (
The instruction sheet that is included with this kit can be viewed at: http://kitsrus.com/projects/sg1m.pdf
Uses
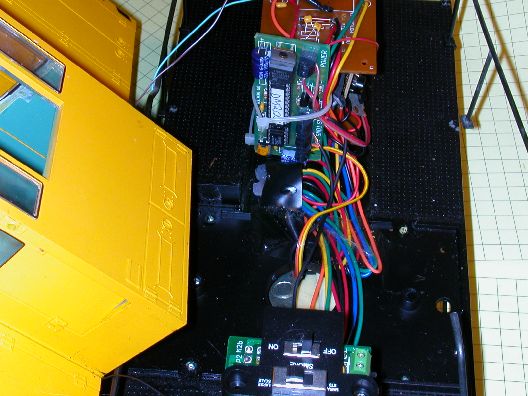
I have one of these boards, a small amplifier and a battery pack installed in a small Hartland Ore Car. The speaker is fastened to the bottom of the car.
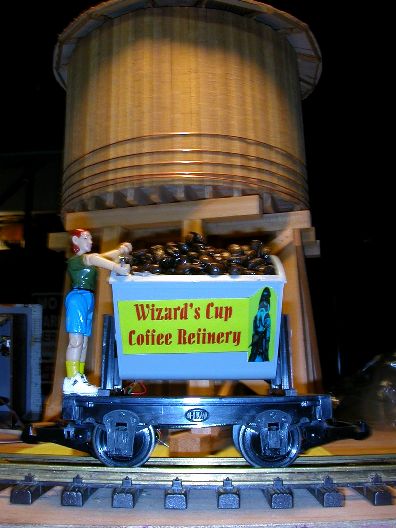
Inside of the car, under a cover of coffee beans, is the circuit board, an amplifier board from an old set of computer speakers and four AA rechargeable batteries. Note that only the main sound board was used. The oscillator resistor was soldered directly to the main board and the audio output transistor was omitted as the audio is fed directly into the amplifier.

I wired the “click-clack” contacts to a reed switch on the bottom of the car. A magnet is glued to one axle and passes by the reed switch every time the axle rotates.
As soon as the car begins to move the sound starts. Because a single switch closure generates several seconds of sound even a slow moving car is able to keep the click-clack sound going continuously. If you wanted a whistle or bell to sound at a particular point the reed switch could be moved down so that a track mounted magnet would start the sound. The only problem with operating the board in this way arises if the car stops moving with the magnet in a position that keeps the reed switch closed. If this happens the sound will not stop till the magnet moves off of the switch. Inserting an additional circuit, called a “one shot”, between the switch and the sound board will guarantee that each encounter with a magnet will only close the switch once. This is on my list of enhancements and I hope to add it soon.
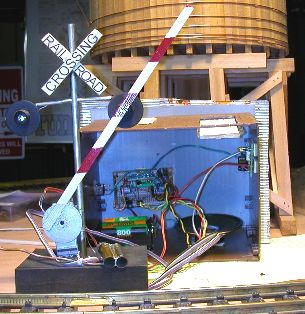
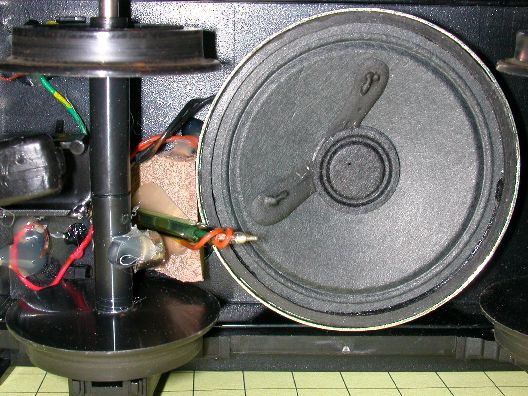
A second board has been installed inside of a shed that is used to operate a servo-controlled crossing gate. When a train passes near the gate an infrared beam is reflected off of the cars causing the lights to flash, the arm to drop and the crossing bell to sound. In this instance the sound board and other devices are controlled by the same type of microprocessor that was used in last year's 3 part robot train project (see: http://www.largescaleonline.com/members/emag/article_329.html , http://www.largescaleonline.com/members/emag/article_330.html and http://www.largescaleonline.com/members/emag/article_331.html ) . If there is interest this could be the subject of a future article.
FOUR TRAIN SOUND BOARD #2
A similar unit is available from Transtronics at: http://xtronics.com/kits/EM-105.htm . The price for item # EM-105 is just $5.00. They have a $20 minimum but that is easy to meet as they have lots of other good stuff! It is similar to the first four train sound board in that it has a single integrated circuit under a blob of epoxy and uses a 1 transistor amplifier. The sounds it generates are similar to those produced by the first board but are not identical.
Construction should take another 15 minutes or so. Everything is included except for batteries and switches to activate the individual sounds. This board works a bit differently and the designers seem to intend to have only one of the sounds activated by permanently soldering a jumper between its pad and the positive power pad.
Note: the links below will play MP3 files that I made from each of the sounds on this board. These recordings were made by placing a microphone near the sound board’s speaker. Nothing has been done to modify or enhance the sound. Since a single button press would only give a short sample I have recorded several seconds of each sound.
K1 – Whistle – one touch gives one blast – the whistle sounds continuously if you connect a permanent jumper.
K3 – Crossing Bell – one ring is produced by a touch or continuous ringing from a permanent connection
K4 – Chuff sound – connecting this pad for just a moment creates just a brief sound. Permanently connecting it produces a continuous sound
Note that the operation of these two boards is significantly different in that the first board could easily be triggered by a reed switch giving a momentary connection. If it were connected to the crossing bell, for example, you would hear 8 rings. Similarly a reed switch connected to the whistle would give 3 blasts. The second board would give only a brief sound when activated by a reed switch. This board really needs an on off switch or some sort of activator that would keep a connection to one of the sound pads for a few seconds to create a more continuous sound.
Both boards come with a 3 volt power supply that comes from two AA cells. While using this battery as a power supply will give good service during setup and testing it is likely that it would not last long if left connected within an engine, railroad car or building. I have used four rechargeable AA cells for most of my applications. Increasing the voltage is particularly important if you are using an external amplifier as most need at least 5 or 6 volts to work well. If you would like to power these boards from track power you can use a bridge rectifier, 7805 voltage regulator and capacitor to maintain the proper polarity and drop the track voltage to a safe level. See the notes at the end of the article for plans to make a circuit that will take voltage from the track and convert it to a level that is safe for this circuitry.
Uses
I have not yet permanently installed one of these boards on my railway but am sure to in the neat future. Its crossing bell sound is nearly as good as the one from the first board and it would work well with my crossing bell application as it is controlled by a microprocessor rather than a reed switch. If you find a home for one on your railway please let me know how you used it.
STEAM ENGINE WHISTLE KIT:
http://store.qkits.com/moreinfo.cfm/MK134
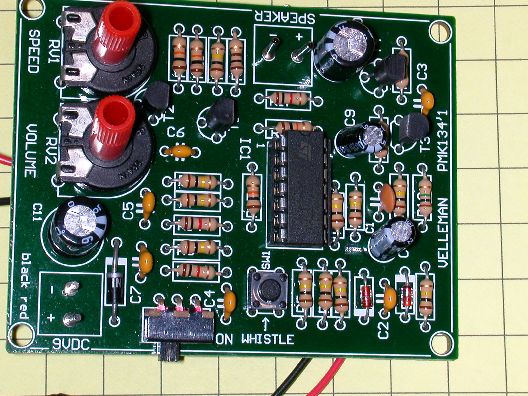
While the price, complexity and number of components in this kit would make one think that it would give the best sound of the three it is, in my humble opinion, the worst of the group. After spending more than 30 minutes putting it together I was rewarded by, at best, a mediocre representation of the sound of a steam engine. Even after spending some time adjusting the speed and volume controls I was unable to create any sound that I would be happy to use on my railroad.
TRACK POWER FOR SOUND BOARDS
These sound boards work well when powered from a 5 volt regulated power supply. This was the topic of a recent article. See: http://www.trainelectronics.com/artcles/voltage_regulator_article/
AMPLIFIERS FOR SOUND BOARDS
The output from the first two sound boards is too weak to provide enough sound for outdoor use. Fortunately there are simple amplifier kits that can be used to raise the volume dramatically.
The easiest solution is a 2 watt mono amplifier that can be purchased from:
http://store.qkits.com/moreinfo.cfm/fk602 for less than $6.00.
If you have a good understanding of circuits and printed circuit boards you can purchase a 2 watt stereo amplifier from the same folks:
http://store.qkits.com/moreinfo.cfm/fk603 and cut the board in half, realizing two small 2 watt mono amplifiers for around $4.00 each. You only need to jumper the + voltage and ground on one of the ½ boards to get it to work. I have done a few and it works well.
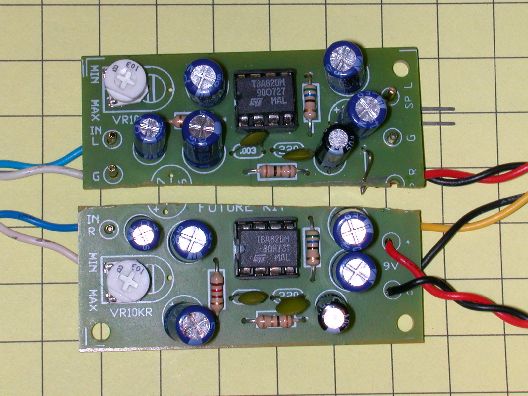
At full volume, either of these amps will drive a good speaker with enough power to be heard across a very large outdoor layout!
To wire them connect the positive and negative power leads from the amplifier board to the same power supply you are using for the sound board. The amplifier will have two pins for input. One is connected to ground (- lead on the battery) and the other goes into the amplifier circuitry. Since we already have a ground connection through the battery we only need to connect the other wire to the base (center lead) of the amplifier transistor on the sound board. It is important that you not connect the speaker output from the sound board directly to the input of the amplifier. The transistor must be bypassed.
Good luck and stay tuned for the next article on sound boards which will explore some very attractively priced digital recording devices that will allow you to record and play back any train sounds, animal sounds or other sound effects with surprising fidelity and volume! That will truly give your railroad a voice!