A Very Capable MP3 Sound System
03-04-10
I have had an interest in sound recording
/ playback devices for many years and love to use them to add sound effects to
trains and layout animations. I recently came across an unusual sound
system that addresses many of the weaknesses and problems associated with other
sound systems I have used. In my opinion it really hits a "home run" as it:
is easy to use
plugs directly into a computer's USB port for sound downloads
utilizes the most common type of sound files, MP3's
costs about $10.00 (should I have put that first??!!)
can record up to 50 seconds of sound
is easily connected to external speaker systems
can easily be triggered by switches or Radio Control systems
Overview
I discovered this MP3 player when I was doing research to develop the train layout at Pittsburgh's Children's Hospital. I needed to have a number of different sound effects that could be individually triggered and playing simultaneously throughout the display. I considered using a more sophisticated sound player but the costs added up quickly. That is when the $10.00 MP3 player described here caught my eye!
The unit I have been working with is from an electronics distributor called Electronics 123. I have been ordering parts and various electronic devices from them for years and have written about another of their sound boards. See: Give Your Railroad a Voice - Part 2.
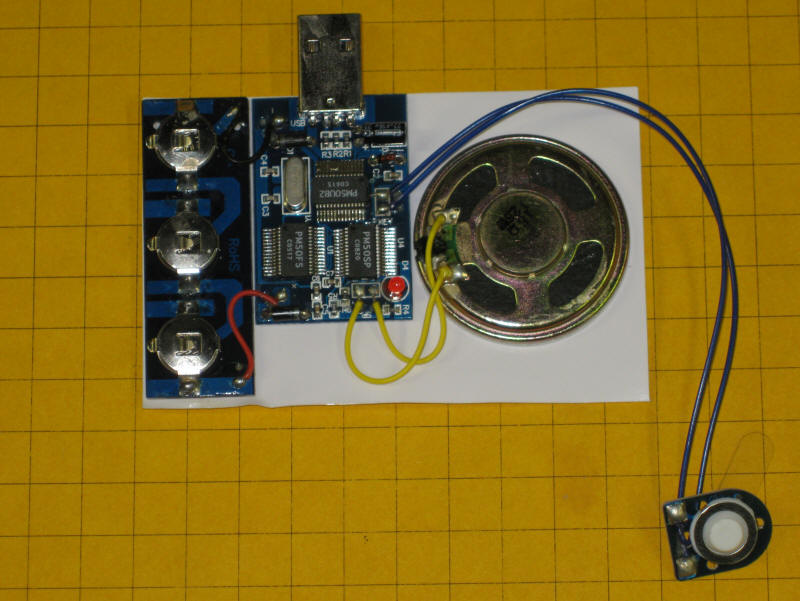
The new sound board comes attached to a thin plastic sheet and is made up of four modules.
A power supply section composed of three small AG10 cells (at the left in photo above)
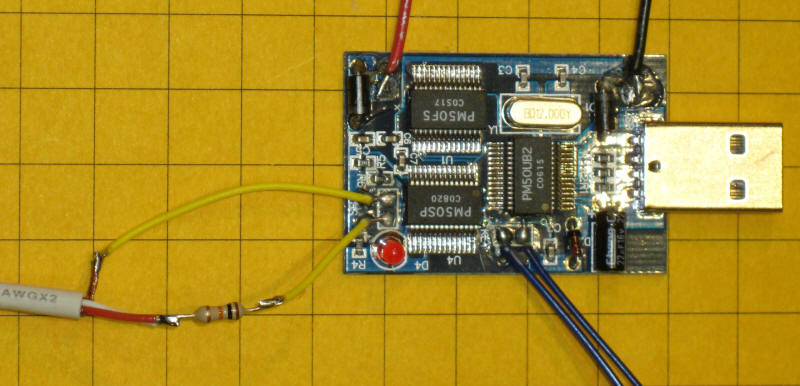
The electronics board in the center - note the built-in USB connector at the top of the board
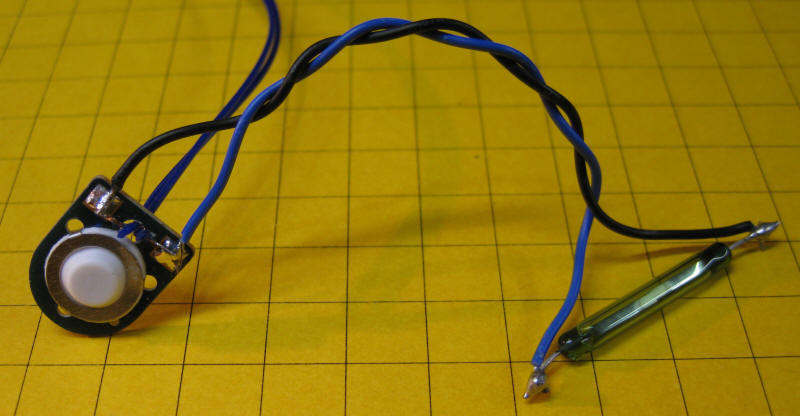
A 16 ohm speaker
A small SPST momentary pushbutton switch at the end of a length of wire
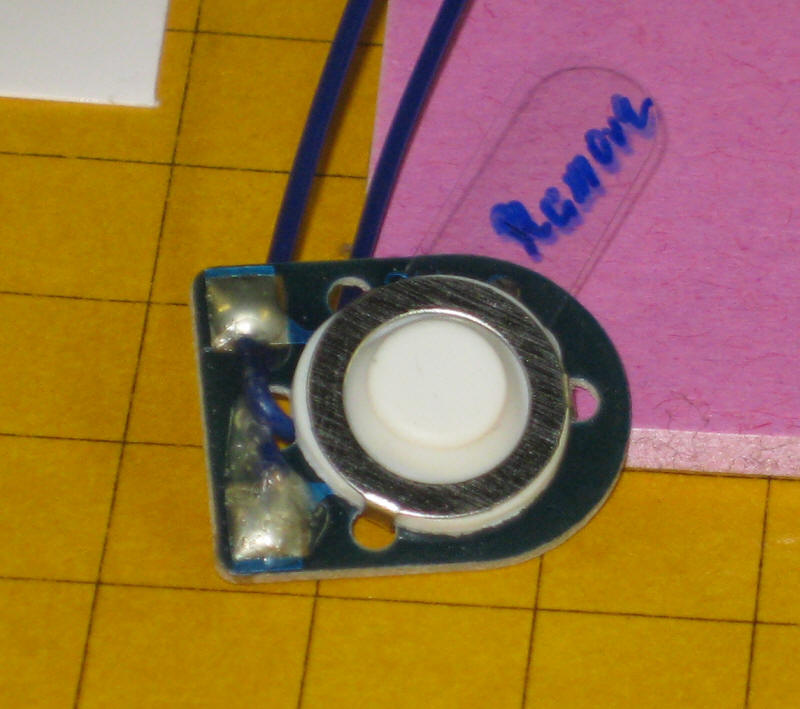
Just remove the small piece of clear plastic (shown below) from the switch and the unit is ready to go. Pressing the switch starts playback of a test sound clip that is installed at the factory.
Each of the modules is connected to the main electronics board with wires. The modules can be removed from the plastic sheet or left as they are originally set up.
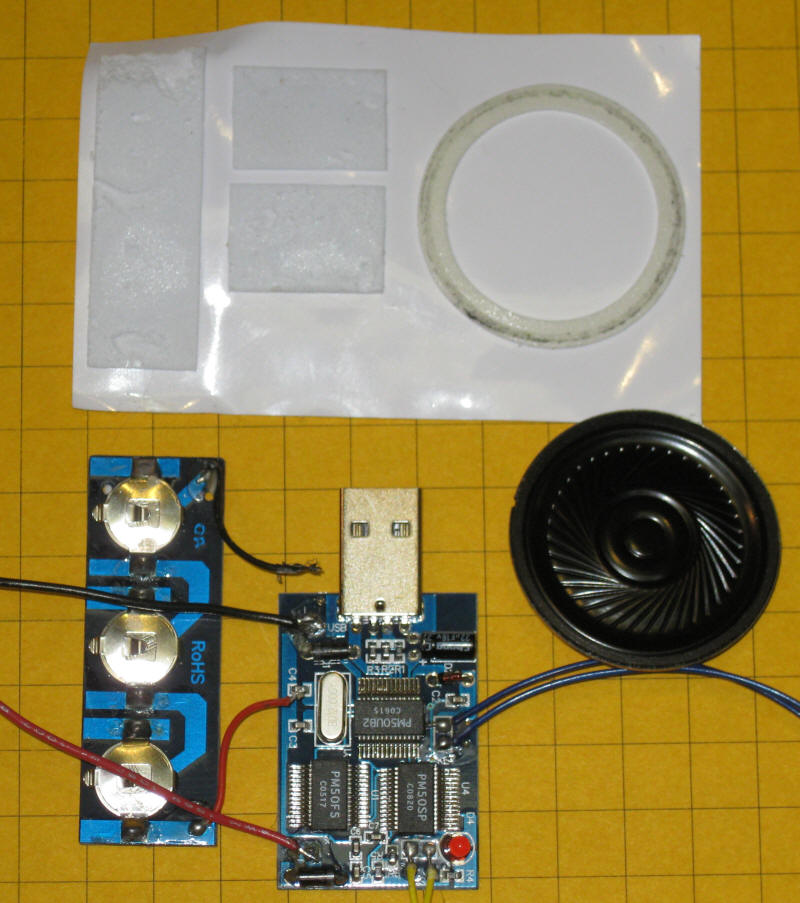
If you decide to remove the speaker from the plastic sheet be very careful as it is easily damaged!
Should you choose to rewire the board you will find that each solder connection is covered by a thin layer of clear adhesive that can gum up your soldering iron. It is best to scrape it off before soldering. If any of the glue remains just clean the iron's tip frequently and you can get through it rather easily.
MP3 Sound Files
Before installing and working with the software for the
board you need to have an MP3 sound file ready to download. I described
how one can locate, edit and save MP3 files in great detail in another article.
Please see
Making your Railroad Sound Alive: MP3 Sound Systems
(Part 1)
for information on locating MP3 files on the Internet and downloading them
and for a detailed description of how you can edit MP3 files using a very capable
(and free!) audio editor. The article describes how to work with stereo
sound files. There is no need to be concerned about stereo files as this
sound unit has only one audio channel and the software automatically changes
stereo files to monaural.
The sound module can record either a 50 second MP3 sound file or a 25 second sound file. The difference is the quality of the sound that is recorded. The 50 second file mode records at a lower sample rate and has lower quality. The 25 second mode records at a higher sample rate and, as one would expect, has higher fidelity. For most of my animation sound effects 25 seconds is more than enough so I usually use the 25 second mode.
If you don't need even 25 seconds of audio you can record whatever length you want and the unit will stop when the sound clip has been played.
Software
In order to get your own sounds into the module you need to download and install VDM Writer, a program that is available from the Electronics 123 web site. I have installed and tested it on Windows XP, Windows Vista and Windows 7 and find that it works on all of these versions of Windows. I do not think there is a MAC version.
When you run VDM Writer this screen is displayed:
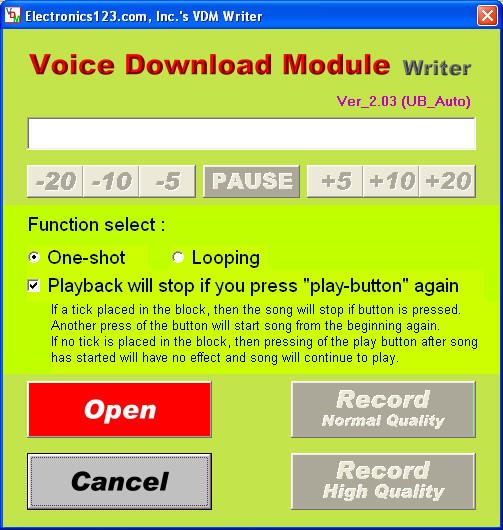
Click on "Open" and browse to the folder containing your MP3 file and load it into the program.
The file's name will be displayed in the box at the top of VDM Writer.
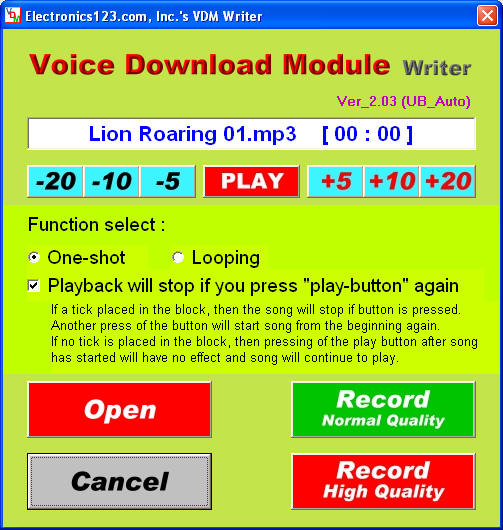
Click "Play" to listen to the file. Click the + and - buttons on either side of Play to jump ahead or back 5, 10 or 20 seconds.
The other options are "One-shot" or "Looping" playback. If you choose "One-shot" the sound will play once when the button is pressed. "Looping" will play the sound over and over until the button is pressed again.
The "Playback will stop..." option determines if the sound will stop when you press the button while the sound is playing. If you don't check this box the sound will play to its completion once the button is pressed. Note that this is the case if "One-shot" is selected. If "Looping" is selected the sound will play over & over until the power is removed from the board or it is reprogrammed. I got stuck in this loop while experimenting and had to reload the sound file with the Playback box checked to get it to stop!
When you choose "Record Normal Quality" you can use a sound file of up to 50 seconds duration. "Record High Quality" records up to 25 seconds.
Connecting to External Speakers
The speaker that is included is small and is not very loud. You are likely to need to connect the unit to an external amplifier and speaker system to give sufficient volume for use in a garden railroad environment.
The most likely candidate for an external sound system is an old set of computer speakers. The good news is that most of us have a set of these left over from an old computer. They are also easy to connect to the MP3 sound player.
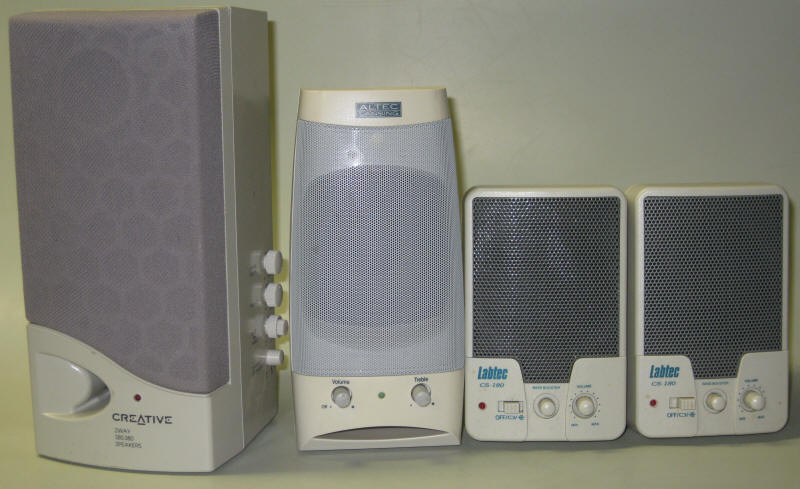
All of the speaker systems I have tried can be connected by wiring the input plug directly to the speaker output of the sound player. The only additional component that is needed it is a resistor wired in series with the output to help match the two systems.
This photo shows a typical input connector that would normally plug into the back of a PC. The lower portion of the photo shows what is inside of the cable after the plug is cut off. The red and white wires are for the left and right stereo channels and the copper braid is the ground connection.
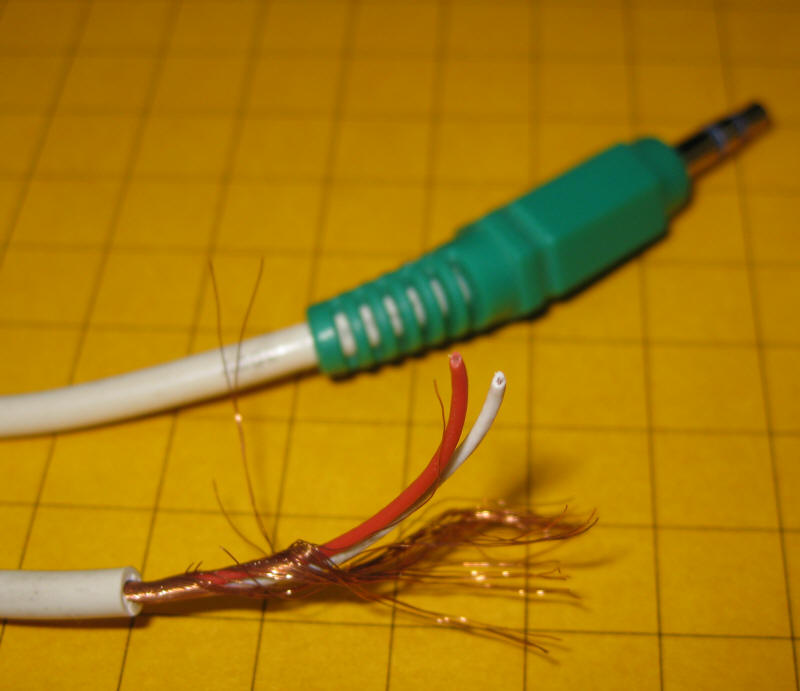
Since we are working with monaural sound the red and white wires can be soldered together. Here we see the completed wiring to the MP3 board. There is a 10K ohm resistor between the red/white wires and the circuit board. It reduces the output level and helps to match the output from the MP3 board with the input of the speaker system. If the volume is too high or the sound is distorted you can try a resistor with a higher value.
If you want to install the sound system inside of a box car you can disassemble the speaker system and install the speaker and amplifier circuit board without the housing. Many of the small speaker units I have disassembled fit nicely inside of my rolling stock. A 12 volt battery will power most of them.
Triggering the Sound Unit
The switch that activates the sound board is a SPST (Single Pole Single Throw), NO (Normally Open) push button switch. One of the easiest ways to trigger sounds on a model railroad is with a reed switch which is also SPST and NO. Simply connect the reed switch to the contacts on the existing switch and glue a magnet to the bottom of a locomotive or car. Each time the magnet passes over the switch the sound will play. This could easily be used to trigger a grade crossing bell or other sound as the train goes by. For more information on reed switches and other sensors that you can use to trigger the MP3 board see: Garden Railway Sensors - Part 1.
TIP: If you find that a switch activates the board intermittently it is possible that you are experiencing "switch bounce". This happens when a switch closes / opens / closes a few times whenever it is activated. Electronic circuits are fast and can interpret this as a Start / Stop command when you meant it to start the sound. To work around this just make sure you remove the checkmark in the box next to 'Playback will stop if you press "play-button" again' in the VDM Writer software.
As you can see in this photo I just wired a reed switch in parallel with the contacts on the supplied switch. This was nice for testing as I still could trigger the sound with the button. Make sure you take a minute to scrape the glue off of the solder pads on the switch if you wire to it. Leaving it there makes it difficult to solder.
You can also mount the sound card, amplifier and speaker in a car and place the reed switch under it. A magnet on the track can trigger the sound on the car each time it passes over it.
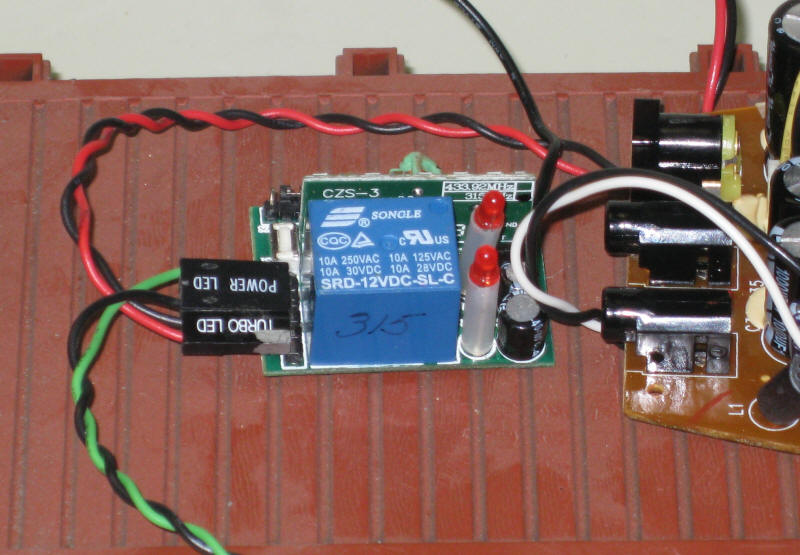
Radio Control Activation
Remote control systems, like Aristo Craft's Revolution, can be used to trigger the sound unit as well. The "open collector" auxiliary outputs on the Revolution receiver can be connected directly to the trigger input on the MP3 board. The two wires that go to the trigger are labeled "key" on the board in the photo below. The one on the left in this photo connects to the board's ground or negative connection. This wire goes to the black wire on the Revolution's auxiliary output harness. The other wire on the MP3 board goes to one of the Revolution's six colored wires. I connected mine to the blue wire which is activated when you press "1" on the transmitter's keypad.
TIP: It may not be absolutely necessary but I put a 1000 ohm resistor in series with the connection to the Revolution's blue wire. That is cheap insurance that will help to protect the receiver should something go wrong. Make sure you configure the Revolution so that the output is set to Momentary, not Latching.
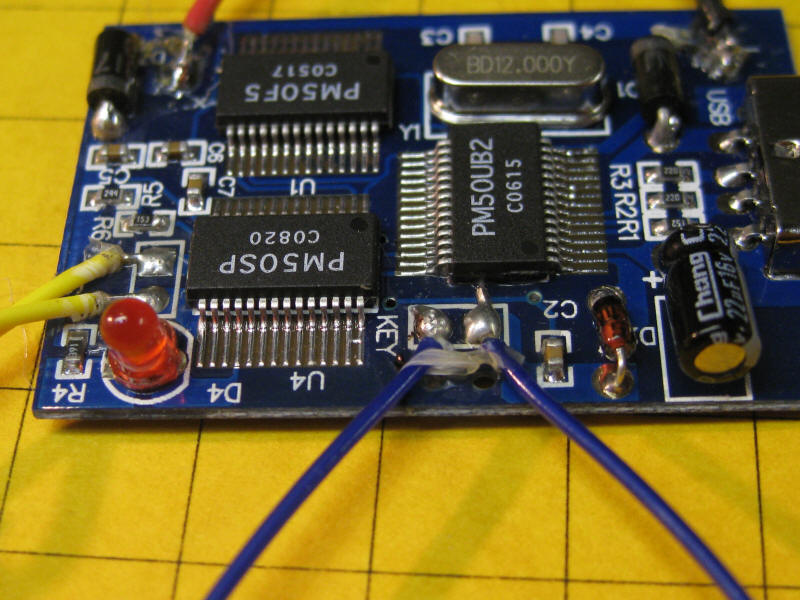
Here I have the MP3 board wired to the auxiliary wires. The black and blue wires are used in this application. It does matter which one goes to each of the MP3 board's terminals!
Providing External Power
The batteries that come with the unit will provide power for many, many hours but the board really needs an external, plug-in power supply to be used for an extended time.
Each of the three cells that make up the provided power supply deliver 1.5 volts for a total of 4.5 volts. I have tested the board using a common 5 volt voltage regulator, the 7805, and it works well. In fact, I have seven of these boards running on power from 7805's at the Children's Hospital layout and they have been trouble-free for nearly a year.
An article that I wrote some years ago
describes how to provide 5 volts to electronic circuits like this can be found
here:
5 Volt Power for Railway Electronics
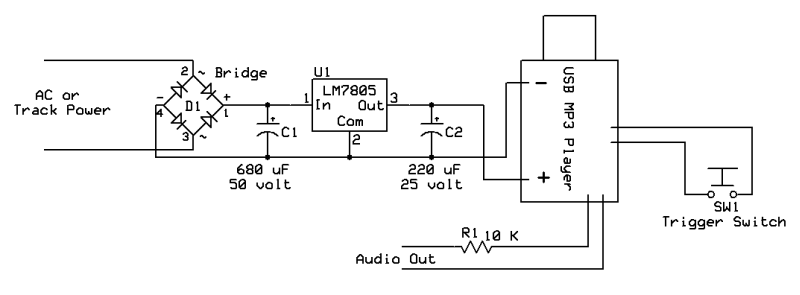
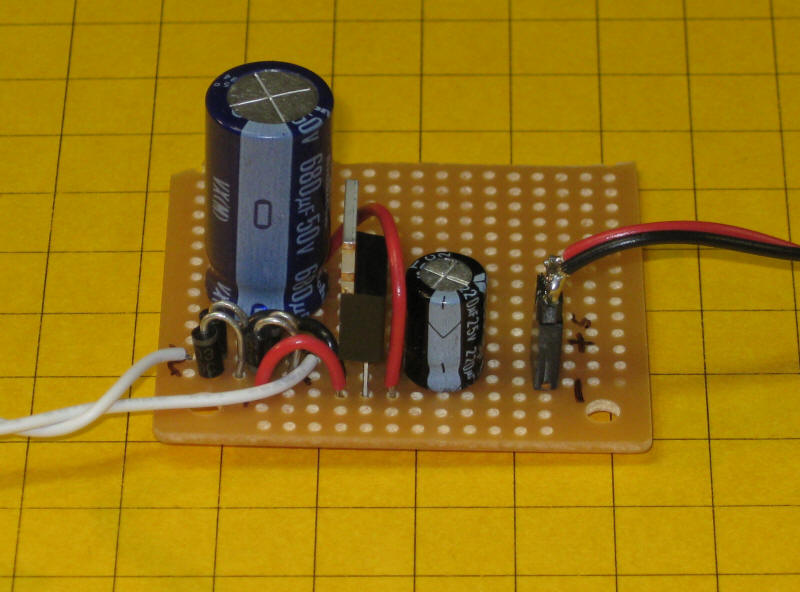
The circuit that I used for testing is shown below. It can get power from an AC power source, batteries or track power. The bridge rectifier gives fixed polarity DC and the 7805 voltage regulator gives us 5 volts. The two capacitors, C1 and C2, are used to clean up the voltage and are particularly important if you are supplying track power which can vary as the train passes over dirty track. Their values are not critical, just make sure the voltage rating is at least double the voltage they will see. 50 volts on the track power side is adequate and 25 on the 5 volt side is more than sufficient. Note the 10K resistor on Audio Out. You may need to increase this value if the speaker system you use sounds distorted.
TIP: If you are powering from batteries or some other source of fixed polarity DC you can eliminate the bridge rectifier. Just make sure that the positive wire goes to pin 1 on the regulator and that the negative wire goes to pin 2.
This photo shows the completed power supply for the MP3 board. The white wires at the left supply track power and the red/black at the right give filtered 5 volts.
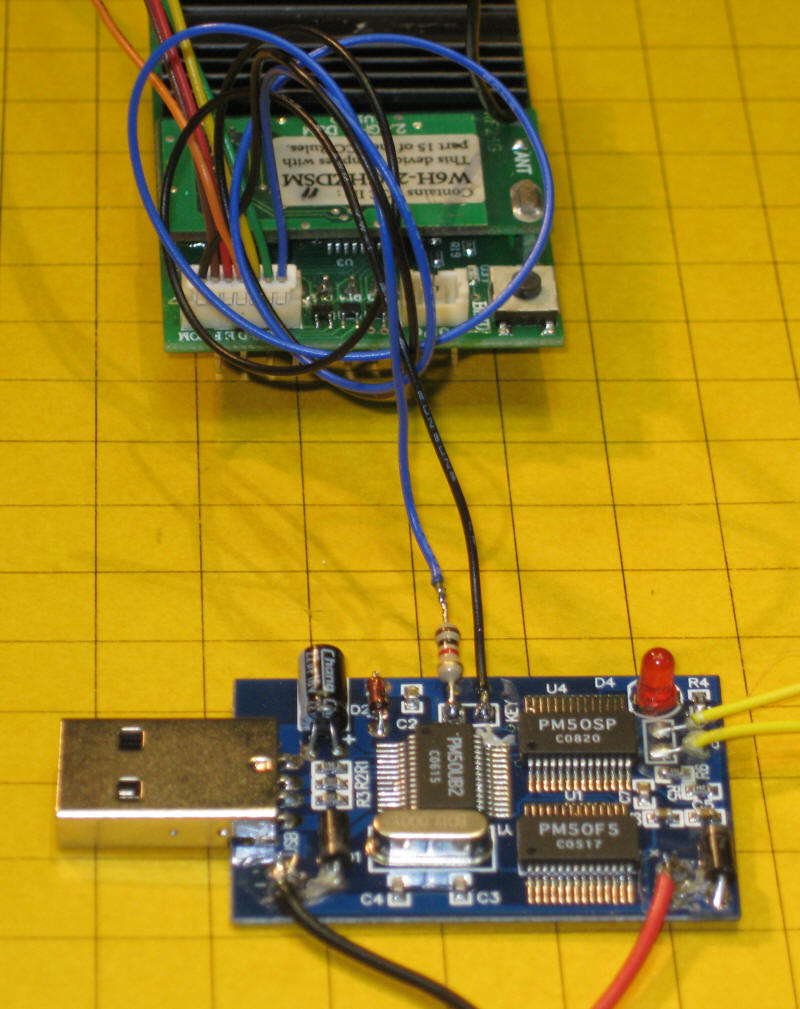
Putting it all together
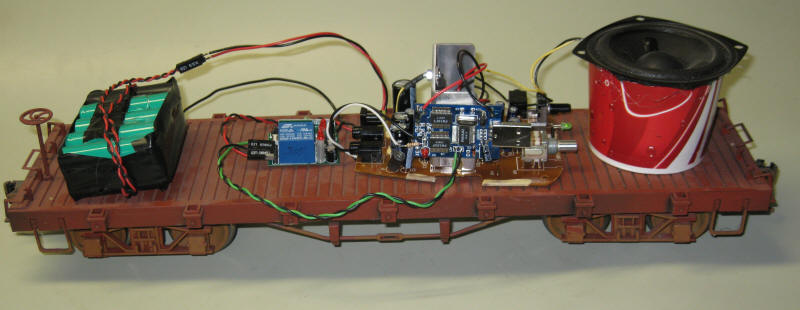
Here is an example of what can be done with a mobile sound car. The system was installed on an open flat car so that these photos could show how easily it fits in a G-scale car. It would more commonly be installed in a closed freight car. From right to left the parts are:
a speaker from the computer sound system. The cut off paper cup acts as a baffle to improve sound quality and volume
the amplifier board from the same sound system.
the MP3 sound board is attached to the front of the amplifier's heat sink. If you look carefully you can see it.
a single channel radio control receiver that is used to trigger the sound by pressing a button on a small radio transmitter
ten NiCad cells in a battery that delivers 12 volts DC.
In this view you can more clearly see the MP3 board that is taped on the side of the heat sink. You can also see the 7805 voltage regulator that was screwed to the same heat sink. It supplies 5 volts for the MP3 board from the 12 volt battery pack
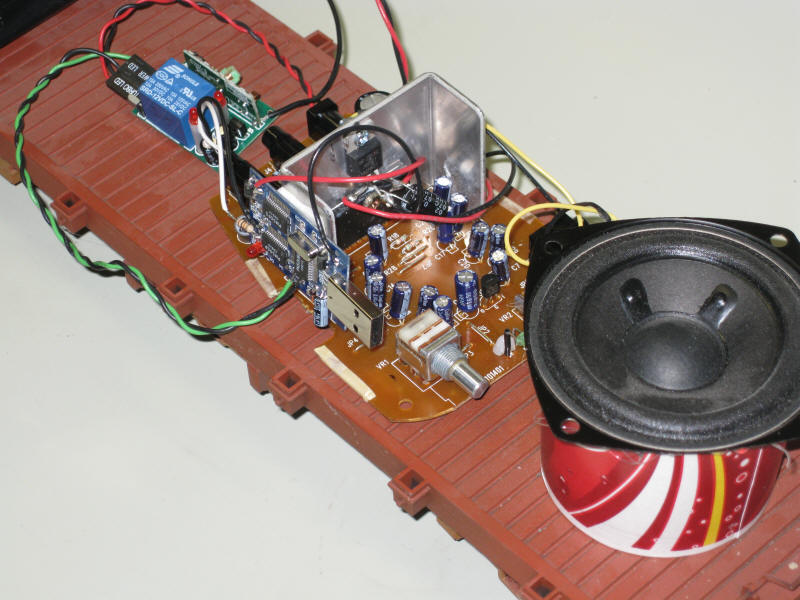
The radio control receiver takes power from the same batteries and connects directly to the trigger input on the MP3 board.
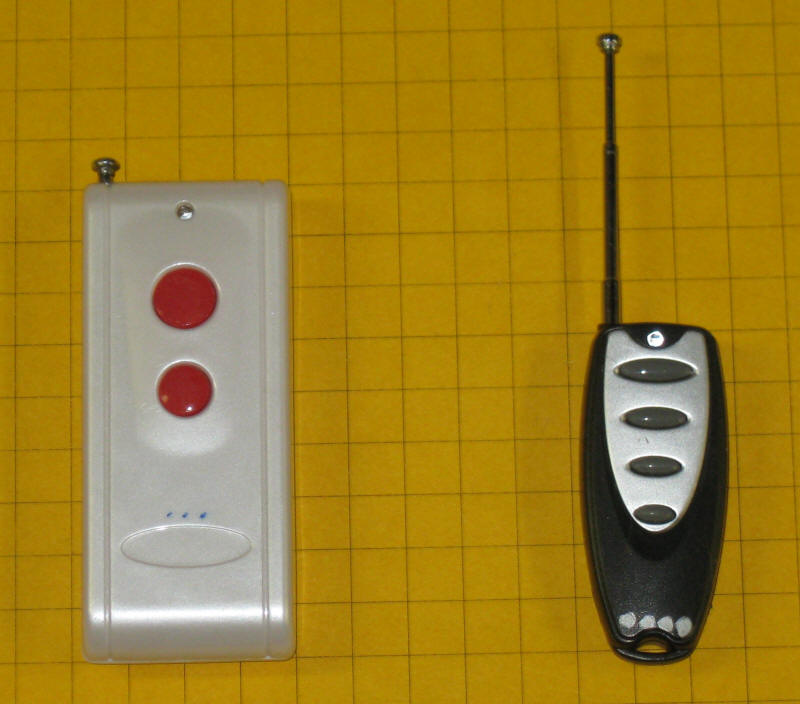
The transmitters that are used to key the sounds on the car are shown below. The one on the left can control two different relays and the one on the right can control four.
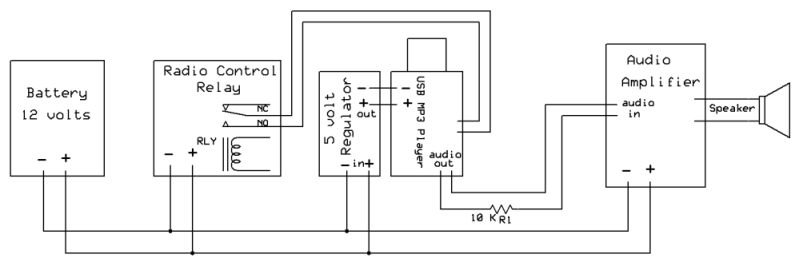
This block diagram shows how the parts of the system are wired together.
TIP: You can connect two MP3 boards to a stereo amplifier and get two sounds, one from each stereo channel. Connect one MP3 board to the left channel (the white wire shown earlier) and the other to the red wire. Install two speakers and you will have a two channel sound system. One reed switch could activate a recording of a locomotive ringing its bell and the other could sound a horn sounding a crossing signal. This is the way I wired these boards at Children's Hospital so that I only needed 1/2 the number of amplifiers for the layout.
Conclusion
I think you will find that this inexpensive sound board is very capable and easy to use. In my work with the MP3 board it has proven to be an excellent product and meets many of the needs that I have had for adding sound to layouts and animations. Give it a try and, as always, let me know if I can help.